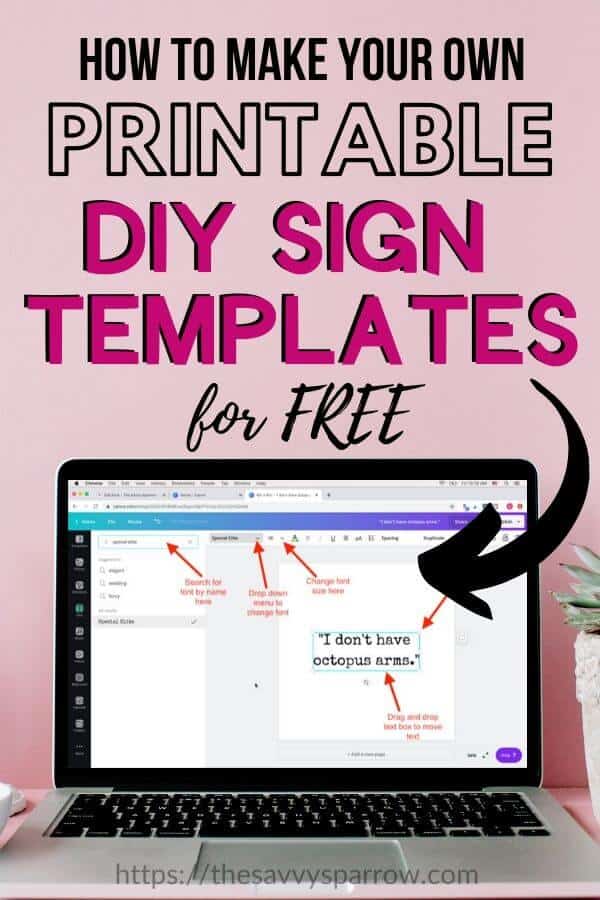
Printable sign templates are super helpful to make your own DIY signs, even if you have awful handwriting. Learn how to make sign templates for custom signs. Then, use your DIY sign templates to make signs with lettering. No vinyl cutting machine needed!
If you’ve been around here for a while, then you know that most of my favorite DIY projects are signs… and most (scratch that… ALL!) of my DIY signs start with printable templates.
I don’t have a Cricut or a vinyl cutting machine, and my handwriting is crap, so I had to get creative to make my own signs.
So I started making my own sign templates. And I’m going to show you how to do the same so that you can easily create your own custom DIY signs for your home decor.
By the way, if you’d rather just buy a bunch of sign templates pre-made and ready to go, then I’ve got a whole shop of them here!
*This post contains affiliate links, which means if you click a link and make a purchase, I earn a commission at no additional cost to you. Read my full disclosure here.
How to Make Sign Templates for DIY Home Decor Signs
This easy tutorial is based on the DIY Quote Wall Art that I did HERE! I’ll be showing you how to make the templates that I used in that project, but the process is the same no matter what signs you need.
Step 1: Go to Canva.com
Canva is an online graphic design program that I use for ALL of my blog graphics and DIY sign templates.
And it’s FREE!
They do have a PRO version that you can sign up for to gain access to premium fonts, but the FREE version works just fine for this project. I actually used the FREE version for almost a year when I first started blogging, and you can do SO much with it… so no need to spend money unless you just want a wider selection of fonts.
After you get to canva.com, you will need to set up an account by inputting a username and password.
Step 2: Click “Create New Design”
Step 3: Select “Custom Dimensions”
On the right side of the pop-up box, change the “px” to “in” for inches. Then, change the width and height to match the dimensions of your finished sign.
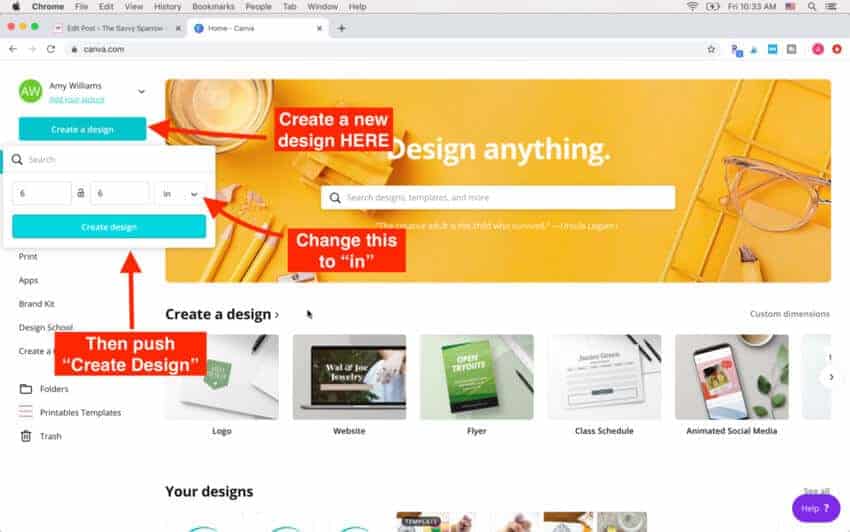
In my example video, I’m making a template for 6″ x 6″ square canvases, so I changed the width and height to 6. If you want a template for an 8″ x 10″ sign, then you would change the width to 8 and the height to 10… you get the idea.
After you’ve changed the dimensions, select “Create Design”. A new window will open with a blank page.
Step 4: Select the “Text” icon to add text
On the far left of the screen, you will see a long row of icons (templates, photos, elements, text, etc). Select the “Text” icon. Then select, “Add a heading”.
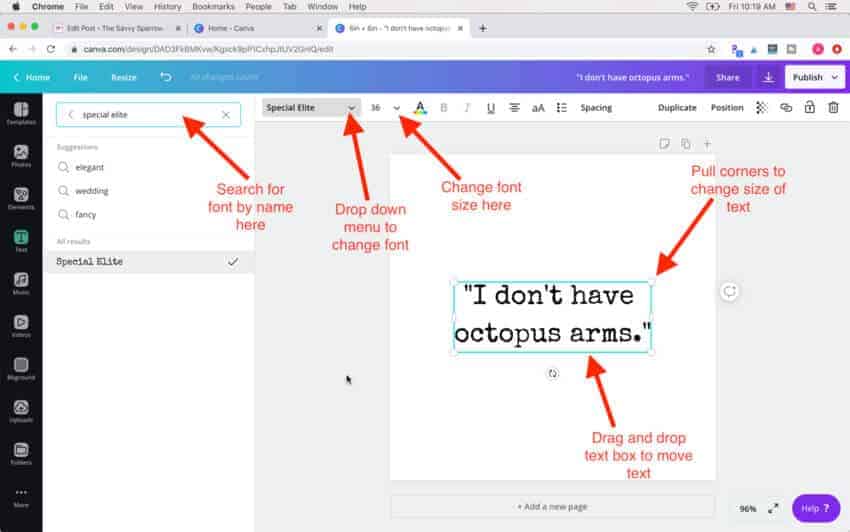
Once you select “Add a heading” a text box will appear on your page. Type your wording in the text box.
Then, you can change the font, the text size, color, etc. Be sure that the text box is highlighted and outlined in blue (like the photo above) before trying to change the font.
For the DIY Quote Wall Art that I made, I used the font called “Special Elite”. However, the FREE version of Canva has a LOAD of different fonts for you to choose from.
To move your text on the page, just drag and drop. To easily resize the text, you can click and drag one of the corners of the text box.
Step 5: Add another text box for more text in a different place or different font
To add another text box, simply click the “Text” icon from the left of the screen again, and select “Add a heading”. Then repeat the steps above to change the font, wording, color, size, etc.
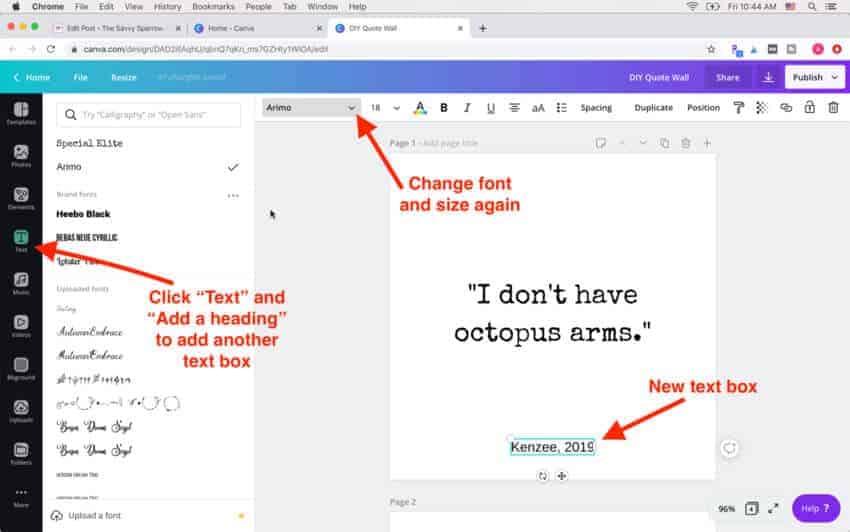
If you’re following along to make your own DIY Quote Wall Art, then click “Add a heading” and change the font to Arimo and the size to 18. Then type in the name of your child and the year.
Step 6: Add another page if needed
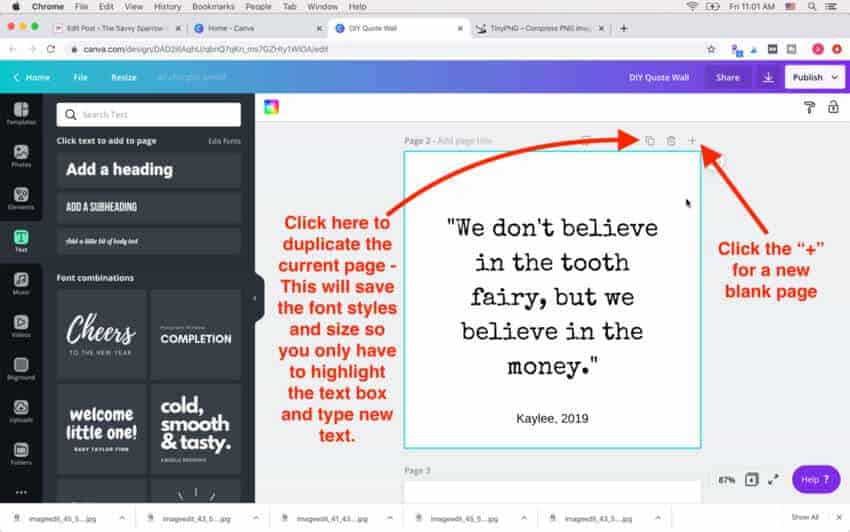
If you want to make another sign template in the same size (in this case, 6″ square), then you have two options:
- Click the “+” icon for a new blank page.
- Click the 4th icon (two blank paper) to duplicate the selected page. By duplicating the page, you can easily highlight the text and type a new quote, keeping the same font style and size.
Step 7: Save your DIY Sign Template
Once you’ve got your DIY sign templates finished, then you need to download them to your computer to print them out.
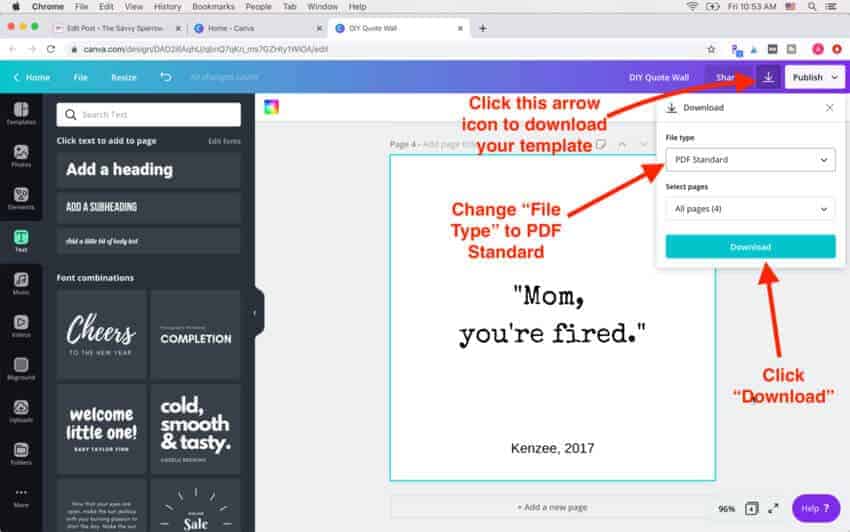
Here’s how to download your DIY sign templates to use to make your own signs:
- Click the arrow down icon at the top right of the page.
- Change the file type to PDF Standard. This will make it so that your sign template prints in the correct dimensions.
- Select the pages that you want to print.
- Click “Download”.
Get FREE DIY Sign Templates
If making your own sign templates sounds like a stretch, then you can sign up for my FREE email newsletter, and I’ll send you a FREE “Home” sign template as a Welcome Gift!
Just use the form below, plus you’ll get access to my entire FREEBIES library!
How to Make Printable Sign Templates – Watch me do it!
More of a visual learner? I created a video of the exact steps that I took to make my templates for these DIY Quote Wall Art canvases:
Hope you enjoyed this easy sign making hack! Trust me, once you start making signs with printable sign templates, you’ll never go back to hand lettering signs again!
And be sure to check out some of my other easy DIY home decor projects here!
Happy Nesting!


Comments & Reviews
Very informative and clear instructions. However I need to know what materials I can print the final sign on to stick on premade wood arrows from dollar tree. I have sticker and decal paper, will that work? Thanks.
Hi Virginnia! For all of my signs, I just use the regular printer paper, carbon paper, and Sharpie marker method so I don’t have to use any decal paper or a Cricut machine. You can find the full instructions for how I use the actual printable sign templates to make signs in this post: https://thesavvysparrow.com/cheap-and-easy-diy-farmhouse-wood-signs/ – Hope that helps!
How do I print a 15×5″ word like “Welcome”? It keeps printing off the page.
Hi Steph! You have two options: 1) You can select the “Poster” option in the print window if you open the file in Adobe Acrobat Reader, or 2) You can use a website called “Rasterbator” that allows you to upload any PDF file, and then it turns it into a “tiled” print. 🙂
Hello Amy, I am so grateful I found you online as I was researching DIY signs. I have been looking everywhere for your How to make Printable Sign Templates video but have been unable to do so on your website. Could you guide me to where I can find and access your video. Thanks!
Hi Frances! You can find the step-by-step instructions and video in this post: https://thesavvysparrow.com/how-to-make-printable-sign-templates-for-diy-signs/ – The actual video is down at the very bottom of the blog post. Let me know if you still need help. 🙂
Hi Amy! I was wondering how in the world to grow my wooden decor business because I was limited by the stencils I had. I Thought the only way to do that was to buy an expensive cutting machine. Providencially, I stumbled onto your page, saving myself hundreds of dollars!!!!
Using the method of carbon paper/marker can you spray the work to make it durable for outside?? (on wood)
Hi Kathy! Yes, I would think that you could use some sort of spray sealer over the permanent marker… I would suggest that you test one sign and leave it out in the elements for a few days just to make sure. 🙂
Thanks for sharing Printable instructions.
What weight of paper is best to print the Printables on?
Can I sell the free download
Hi! No, you can’t sell the free download templates… they’re just for your personal use only. And you can print the templates on regular weight printer paper, since you’ll just be using them to trace/stencil the lettering on wood. 🙂
Great tutorial. Thank you. I jumped into Cava.com to make a poster for my farmhouse sign (I’d like my quote to be 30” x 20”). I’m having trouble getting it to print to that scale. It Jeep’s printing to fit on 1 sheet of paper. Any advise for a larger quote that will need to be printed on multiple pages and taped together before using it as my stencil?
Hi Annie! Yes, you can do that with an online program (free) called rasterbator.net – 1) Create your artwork in Canva and then download it as a PDF print. 2) Go to rasterbator.net and click “Create your poster”. 3) Upload your PDF from Canva and follow the steps to select what size you want. 4) For “Style”, select “No Effects”. 5) Continue to follow the prompts and the program will convert your design into a multi-page “tiled” design that prints on however many pages that you specified. It sounds complicated… but it’s very easy! Hope that helps! 🙂
Hi I’m not too big on following blogs and I did follow you on Facebook but I wanted to see how to actually print the logo on a canvas
Hi Brenda! Thanks for the follow! I honestly have no idea how you would print a logo directly onto the canvas… my guess is that it could be done with iron-on vinyl and a Cricut machine, but of course that would set you back some $$ if you don’t already have a Cricut. That’s why I love these carbon paper methods with regular old printer paper – It may take a little bit more time, but it saves a bunch of money. 🙂