
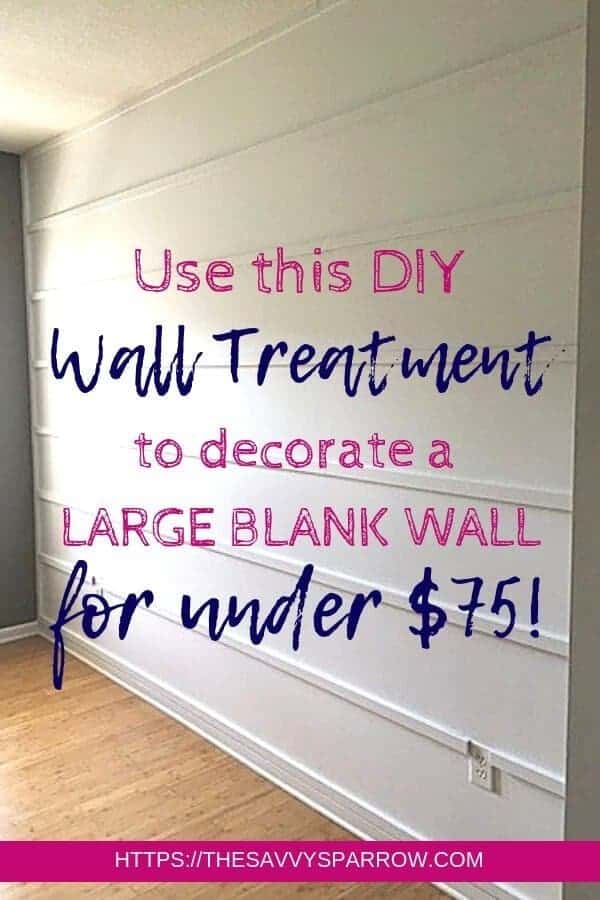
I love shiplap, but I don’t love the price tag. So I created this easy DIY reverse shiplap wall for under $75 to add interest to our plain dining room.
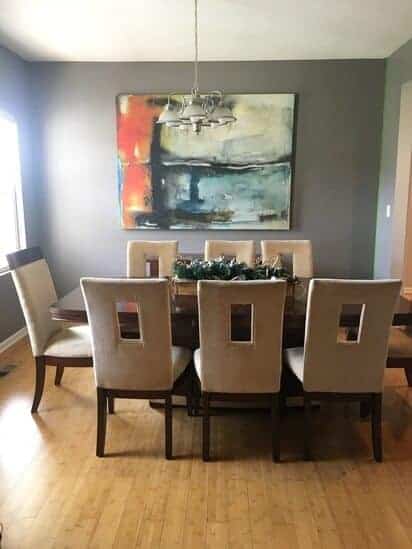
Before a much-needed facelift, our dining room was dark and lifeless. The walls were storm cloud gray, and the solitary piece of artwork that hung in the room was abstract and no longer fit the aesthetic of the rest of the house.
See what I mean:
It needed a remodel, but we didn’t want to spend a fortune on something that we didn’t really need.
So, we had to get creative.
After visiting a friend’s house, we absolutely fell in love with her nursery! The shiplapped wall and soft pink accents were absolutely perfect, and we knew that we wanted to create a similar feature wall for our bland dining room.
But at $11.00 per 8 foot piece, real shiplap was out of the question.
So we visited Home Depot to find the cheapest lumber options to create a DIY reverse shiplap wall treatment.
We settled on primed trim boards that ended up working perfectly for this project. And at $3.58 per 8 foot piece, they were an absolute bargain.
Want to create your own DIY reverse shiplap wall to add a cool DIY wall treatment to your space on a tight budget? Read on for the full tutorial!

This post contains affiliate links, which means I may earn a small commission from these links at no additional cost to you. Read my full disclosure here.
Here’s how we created our DIY Reverse Shiplap Wall in just one day:
*This DIY project is inspired by the awesome wall treatment from My Sister’s Suitcase.
Step 1: Gather your supplies
Here are the supplies and tools that we used to complete this project:
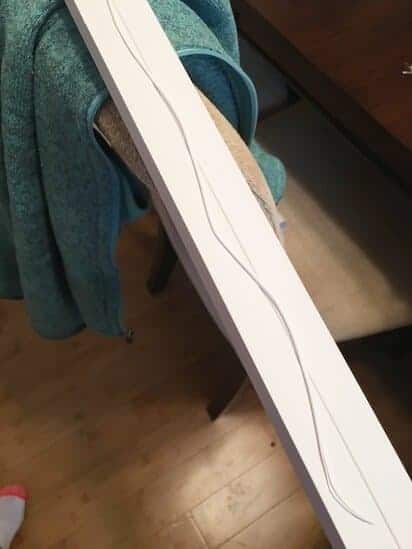
- Primed trim boards (we used 3/4″ x 1-1/2″ x 8′ boards)
- Nail gun and finishing nails
- Liquid Nails construction adhesive
- Paintable caulk and caulk gun
- Chalk line
- Saw
- Paint of your color choice (we used Behr Premium Plus paint in Frost)
Step 2: Figure out your measurements
Our wall is 9 feet tall by 12 feet wide, and we have a 3-1/8 inch baseboard, plus we knew that we were going to use a trim piece on the top of the wall similar to crown molding and a piece right above our baseboard. We knew that we wanted approximately 12-13 inches in between our trim pieces, so we had to do some math to figure out exactly where they would go and look evenly spaced.
I took the height of the wall (144 inches) and subtracted the height of the baseboard (3-1/8 inches) and the height of the top and bottom trim pieces (1-1/2 inch each) to get the total wall height that we would have to work with (101-7/8 inches).
Then, we guessed that we would have 6 trim pieces not including the top and bottom pieces. The height of each piece is 1-1/2 inches, so the height of 6 horizontal pieces is 9 inches. We subtracted 9 inches from 101-7/8 inches to get 92-7/8 inches.
Yes, this next part is a head-scratcher, and it helps to make yourself a little drawing of the wall…
Even though our wall would have 6 horizontal trim pieces (not including the top and bottom frame parts), we would actually have 7 recessed stripes (the spaces in between the trim boards). I divided 92-7/8 inches by 7 to get 13.267 inches, which I rounded to 13-1/4 inches. So the space in between our trim boards would equal 13-1/4 inches.
Whew! Sorry about the math lesson! Just wanted to walk you through our process of figuring out our own measurements so that you can do something similar for your DIY reverse shiplap wall treatment. I swear the math in these DIY home projects is sometimes the hardest part. 🙂
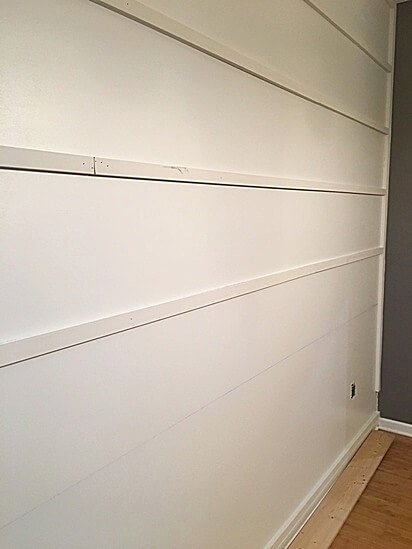
Step 3: Trim out entire wall first
We wanted a polished, finished look similar to a picture frame, so we framed out our entire wall first. We attached trim pieces to the top, sides, and bottom – basically one large rectangle.
To attach trim pieces, run a strip of Liquid Nails adhesive down the length of your trim piece, and immediately attach to your wall. We used a nail gun with finishing nails for added support, but the boards are pretty light, so you may be able to skip this step. I generally just like the peace of mind of an actual nail or screw rather than just relying on adhesive.
Step 4: Use chalk line to mark location of next trim piece
Measure down 13-1/4 inches (or the measurement that you decided on in Step 2) on both sides of your wall, starting at the bottom of the top trim piece and make a light pencil mark. Next, stretch chalk line from one mark, across the wall to the other mark. Pull the chalk line so it is tight and snap it in the middle. Voila! You have a straight line to use as a guide. (FYI – Making the chalk lines will require two people.)
Go here for more instructions on how to use a chalk line.
Step 5: Attach trim piece using your chalk line as a level guide
Attach the trim piece using the same method that you did in Step 3 (liquid nails, nail gun). Make sure to butt the top of the trim piece right up to the chalk line.
Step 6: Attach remaining rows of trim pieces
Repeat steps 4 and 5 until entire wall is done.
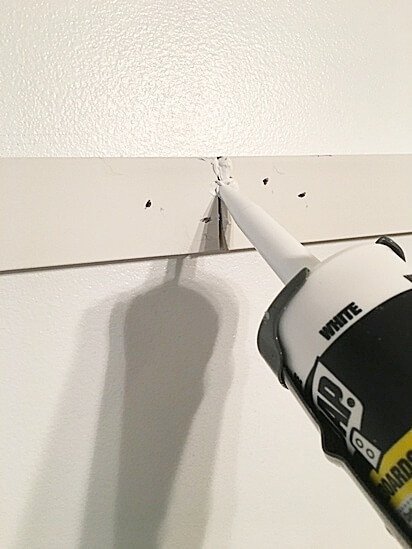
Step 7: Caulk all seams and fill-in nail holes
Using a caulk gun and caulk (we used this one), fill in all nail holes and seams, and caulk the areas on top and bottom of the trim where it meets the wall. This gives your DIY reverse shiplap wall a more polished look. Once your caulk dries completely, you may need to sand over it for a smooth finish before moving on to the next step.
Step 8: Paint wall and trim pieces
I found it easiest to paint the actual trim boards using a 2 inch angled paint brush first. Then, I painted the rest of the wall using a roller and rolled over the front of the trim boards to hide the brush marks from the paint brush.
Admire your new DIY Reverse Shiplap Wall!

There you have it! An awesome DIY idea if you want to add a little oomph to a big ‘ol plain wall.
If you love the look of this project, then you’ve got to check out my DIY mudroom wall! It is probably my favorite DIY home project that we have completed so far. Probably because it’s so practical and helps to manage the craziness of multiple backpacks, purses, and coats. Check it out here!
And, you don’t want to miss my simple fireplace refresh using paint! Modernize your builder grade tile fireplace here!
And be sure to pin this project so that you can create this awesome reverse shiplap wall, too!


I really love this idea and your instructions are great. Could you tell me if you used flat or satin paint on your reverse shiplap?
Thanks
Hi Sue! I used Satin paint for this project, because that’s what was on the other walls in the dining room and I wanted the finishes to match. 🙂
loved reading your article. it was really informational for me. wish to see more in the coming days.