If you’re looking for a great DIY home decor tutorial on how to paint faux subway tile over your existing fireplace tile, then you’re in the right place…

*This post contains affiliate links, which means I may earn a small commission from these links at no additional cost to you. Read my full disclosure here.
Our fireplace was in desperate need of a makeover. It screamed “90s builder-grade” and we wanted it to subtly say “modern farmhouse rustic”. So, on a whim my husband decided to take a crowbar to it.
That’s just the type of man that he is. He’s a “doer” not a “sit-and-think-about-it-er”. He takes action. So, I wasn’t all that surprised to come home to our disassembled mantel spread out in a gazillion pieces on the living room floor.
“Babe, what do you think we should do with this tile?”. Like I said, he takes action… sometimes before we even have a solid plan.
But, as an avid Pinerest user (follow me HERE!), I already knew that I wanted to paint faux subway tile.
This was our fireplace before the crowbar and the chalk paint:
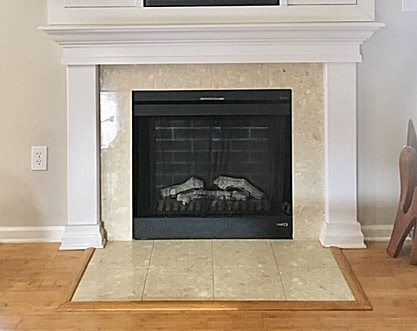
I LOVE the look of white subway tile with gray grout lines. What I don’t love is the thought of spending several hundred bucks to buy all new tile and rent a tile saw, and then having to live in a dusty construction zone for a week.
So, we decided to give it a go and attempt to paint faux subway tile, knowing that if we absolutely hated it then we could just paint over it and start again. (By the way, the back up plan was to use a tile stencil, which I still want to try someday.)
Here’s what we did:
How to Paint Faux Subway Tile Over Your Existing Fireplace Tile
Step 1: Gather Your Supplies
To determine what supplies we would need to paint faux subway tile, we consulted a professional… the guy at the paint counter at Home Depot. He recommended that we use chalk paint to cover the existing porcelain tile on our fireplace. This is the paint that we used.
For the first coat of paint, we used a regular paint brush… don’t do that. The regular bristle brush that we used left brush marks in the paint. For the second coat, we used a small foam roller and it gave us a much smoother result. We only used 2 coats of paint to completely cover the existing tile.
Here are the other supplies that we used:
- White chalk paint – this is the one we used
- Dark gray paint that we already had on hand
- Frog Tape – This is the BEST painter’s tape and I highly recommend it! I painted my daughter’s entire room with baby pink and white stripes using this tape and I didn’t have to touch up a single spot.
- Foam roller
- Yard stick
- Level
- Pencil
- Caulk and Caulk gun
- Small detail paint brush – I used one from my daughter’s art box.
Step 2: Clean Your Existing Tile
Clean your existing tile surface with warm soapy water and a soft rag. Dry it completely.
Step 3: Tape, Tape, Tape
Apply Frog Tape to fireplace border, trim, and any other surfaces that you don’t want painted. I’ve used both Frog Tape and the blue painter’s tape, and Frog Tape wins hands down if you don’t want your paint to bleed through!
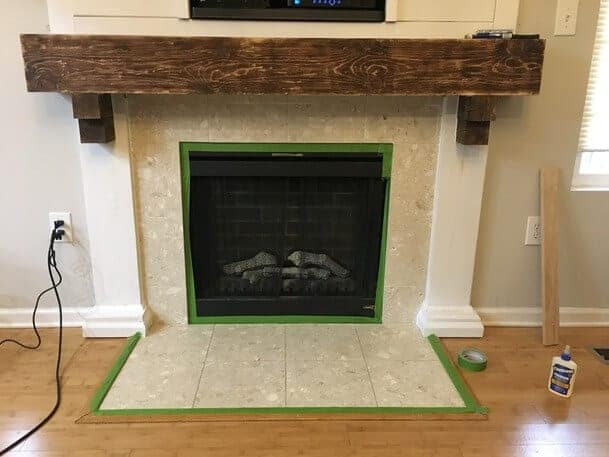
Step 4: Paint Your Base
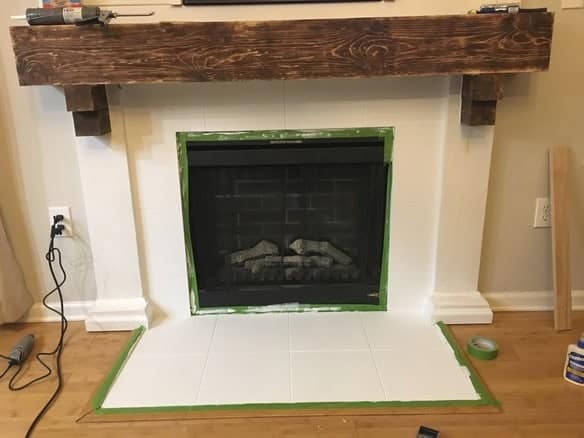
Using the a small foam roller, apply chalk paint in the color that you want for your finished painted faux subway tiles. We used this chalk paint. After applying two coats to our fireplace, we still had over half a can left.
Just painting it white made a HUGE difference in the brightness of the space. At this point, our fireplace already looks more modern and fresh, even without the faux subway tiles:
Step 4: Draw on Your Subway Tiles
To get the placement of your tiles right the first time, I recommend drawing the horizontal lines across the entire fireplace surround first. Since my existing tiles were 12″ x 12″, I just divided the height of one subway tile by 12. One subway tile is 3″ tall, so I knew that I would be able to fit 4 rows of faux subway tile over my existing 12″ x 12″ tile and still take advantage of the existing grout lines.
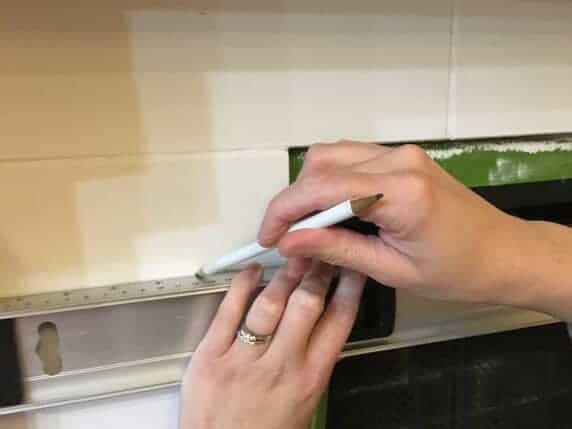
Using a pencil and a level, draw the horizontal lines first. Then, draw the vertical lines of your faux subway tile every 6 inches, making sure to stagger them as shown:
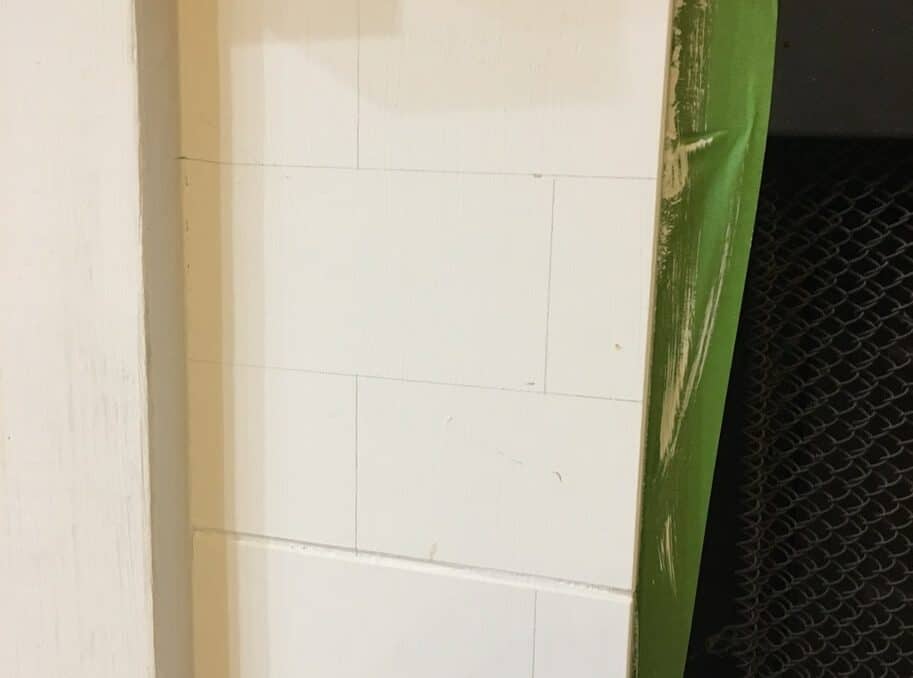
I started from the far left edge and measured over 6″ for my first row of faux subway tiles. Then, for the second row, I drew a line at 3″ and started my 6″ tile there. Alternate starting your tiles at the very edge and at 3″ in. That way, when you paint faux subway tile, your tiles are perfectly staggered and the faux grout lines line up vertically.
Step 5: Paint Your “Grout Lines”
To paint faux subway tile, you must have faux grout lines. Paint on “grout lines” using a small detail paint brush and a yard stick. Make sure that your paint brush is stiff enough, or it will be difficult to get a smooth line. I tried a few different brushes from my daughter’s art kit before finding the right fit.
Line the yard stick up with your drawn on tile lines and paint a thin line to look like grout. Use the yardstick as a guide and butt the paint brush right up against it. In one fluid motion, glide the paint brush down the yardstick. You should end up with a nice straight and smooth “grout” line.
In between each line, wipe the excess paint off the yardstick using a damp rag so that it doesn’t smear on your next line.
Step 6: Caulk and Touch-Up Existing Grout Lines
To make your faux subway tile look even more real, you will probably want to cover any grout lines from your old tile that ended up in the middle of your faux subway tiles.
Using paintable caulk, fill in the grout lines that fall in the center of your subway tile. Try to smooth out the caulk as much as you can so that it is not as noticeable. Once your caulk lines are dry, paint over them to blend them into your faux subway tiles.
This is what I mean:
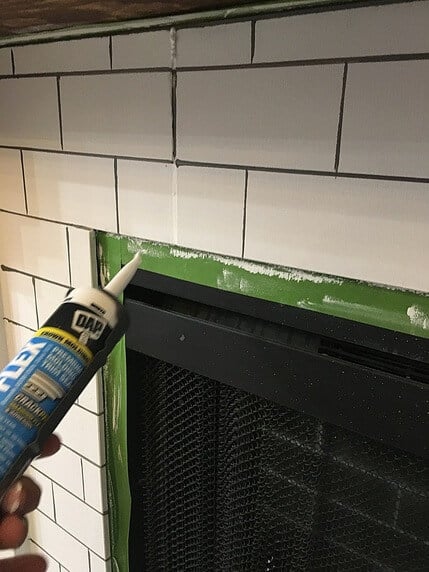
When I was planning the placements of my faux subway tiles, I tried to minimize the amount of grout lines from my old tile that would show through. You can see from this picture, that I painted dark gray “grout” right into the old grout lines in some areas.
You can choose to skip this step, but you will have an indention running through the center of your new faux subway tile. The perfectionist in me wanted to fix it, even though it was not very noticeable.
Step 7: Touch Up
Using a small detail brush, touch up any lines that are feathered or not perfectly smooth.
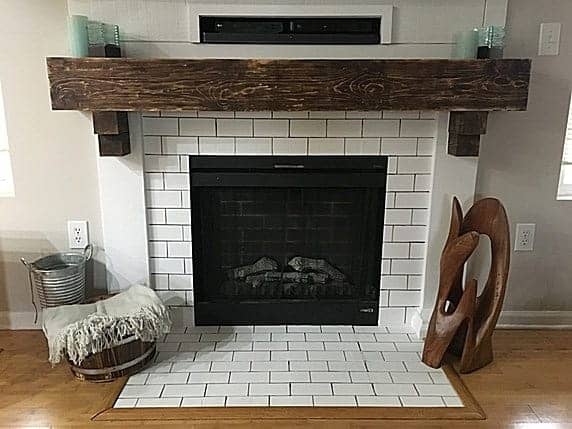
And there you have it… how to paint faux subway tile if you don’t want to spend 3 hours meticulously taping every single line. I had seen other tutorials for how to paint faux subway tile, but they all used LOADS of painter’s tape. And after painting stripes on my daughter’s bedroom walls, I’ve pretty much had enough of painter’s tape for awhile!
And, I’m absolutely IN LOVE with the finished product! I’ll be honest (and at the risk of sounding cocky!), I’ve kind of been amazed at the different DIY home projects that my hubby and I have completed. Neither one of us is formally trained in any sort of carpentry skill, and before 18 months ago, we didn’t even own a power tool.
Yet, we’ve built our own DIY Mudroom Wall and these DIY Farmhouse Wood Signs. Plus, he built us an AMAZING coffee table using an old four poster bed, and he DIY-ed the rustic wood mantle from this post.
So, trust me… if we can do this, so can you. BTW – I’ll do a post to show you how to make your own rustic wood mantle sometime in the near future! 🙂
In the meantime, I’d LOVE to hear from you! Leave me a comment below… maybe tell me about a DIY home decor project that you’ve done (that totally turned out WAY better than you thought it would have).
And check out my other DIY Home Decor Projects:

Comments & Reviews
I love it! But…the mantle how to should be included!!
This made such a big difference! I love how your fireplace turned out. I would love to try this in our home here in West Jordan. We are making a list of home projects to do this summer and will have to add this. Hopefully we can do some kitchen cabinet refinishing too! Thanks so much for sharing your beautiful home.
This is such a great update! It made such a huge difference in your space. We are putting together a list of home projects for the summer here in Sandy and we will have to add this. Hopefully, we can do some kitchen cabinet refinishing too! Thanks again for sharing!
Do you have to worry about the heat coming from the fireplace? I love what you have done and want to update my fireplace too!
Hi Edith! We rarely use our fireplace, but the few times that we have used it since I did this paint project, it has been fine. I don’t know if it matters that our fireplace is gas and not wood-burning… not sure if that makes a difference in the temperatures. 🙂
thanks. Ours is wood burning. Bummer.
Did you try to patch the chalk paint to your white on the mantle or do the colors differ? My mantel is currently wood and I want to paint white but wasn’t sure if it mattered if they match of not. Thanks!
Match* sorry!
There actually isn’t any white on our mantle anymore… the mantle is a rustic faux wood beam that my husband built with 1″x8″ boards and stained a dark color. The paneling above the mantle (under the TV) is white, and I didn’t worry about matching that color to the faux tile. I personally like the look of the rustic wood mantle with the faux subway tile… but as long as both your tile and your mantel are both white (instead of one being ivory), then I think it would look fine. 🙂
Looks great! After using the caulking over the original grout lines, did you have to paint over the caulking so that it wasn’t noticeable?
Thanks!
Hi Kylie! Yes, we did paint over the caulked grout lines with the chalk paint so that they blended in with the faux tiles. The reason why we didn’t caulk FIRST before painting all of the tile with the white chalk paint, is because we didn’t know where exactly the lines for our faux subway tiles would end up being… and we wanted to keep the grout lines that would line up with the faux tiles to give them more dimension and make them look more real. It worked out great for us, and the fireplace still looks AWESOME a year later! Let me know if you have any other questions! 🙂
I have whitewashed my fireplace and floor.
My dogs play over the brick and the paint is rubbing off.
The brick is a soft glaze to begin with.
Any tips to cover and seal this?
This looks Fabulous! I was thinking when I read that your second plan was to do a stencil tile, I thought how pretty it would look to have the walls the faux subway tile and the hearth done in the stencil to make it look like the cement encaustic tiles. Just an idea for you to have the best of both worlds.
Hi Lachelle! Yes, that is a great idea! I’ve never actually used a stencil before, but I’m going to be re-doing my daughter’s room soon, and I’m thinking that I’m going to do a feature wall with a cool stencil. Thanks for your comment!
How has it held up? This is such a great idea but im scared I’ll do all this work and it will just need to be redone.. not much confidence in my diy skills I guess lol
Hi Kayla! It has held up really well over the past year. I’ve got two kids, a dog, and a robot vacuum, and it still looks good as new! If something spills on it, I’ve just taken a warm damp rag and wiped it up… I am going to add a top coat though. I never did that, and I think it will help in the long term, plus it will make it easier to clean dirt off, etc. I’ve got a water-based polyurethane top coat to add, I just haven’t done it yet. If you’re a little afraid of doing it, I would suggest trying this method on a piece of cardboard first, to get a feel for the amount of pressure you need to apply on the paintbrush, the amount of paint to put on your brush, etc. Good luck! 🙂
Hi Amy! Is it possible to do this DIY project if you have marble as your surrounding instead of actual tile? I love this idea, but want it to have the same effect on the marble as it did on your tile.
Hi Abby! I would say yes… Our existing tile was very smooth and glossy, similar to marble. I would advise you to try one very small corner to start off with as a test. I also found this tutorial online for chalk painting marble: https://www.anniesloan.com/techniques/how-to-paint-on-marble-with-chalk-paint Hope that helps! 🙂
Love this DIY to get by until a full gut job! Did you seal over the chalk paint with anything?
Did you do any sort of sealant over top the chalk paint?
Hi! No, we never did a sealant, but it’s on my list of things to do. 🙂 The way our fireplace is set up, the faux subway tile doesn’t get any traffic, so it’s stayed pretty clean. I plan on going over it with some sort of polyurethane in the near future and I will update the post when I do. Thanks for the question!
Awesome! I will try it and let you know how it goes— I’ve had luck with poly on other chalk paint furniture projects
How did you replace the mantle?
Hi Tanoth! We actually tore out our builder-grade mantle piece by piece with a crowbar and then we built it like you would a floating shelf with 1x8s. I’ve got all of the photos of how we did the DIY mantle… just have to write the post! 🙂
HI, Amy! Have you written the DIY mantle post yet? Patiently waiting 🙂
Your post is very helpful. Thanks a lot
Glad you enjoyed it! Thanks for your comment!