
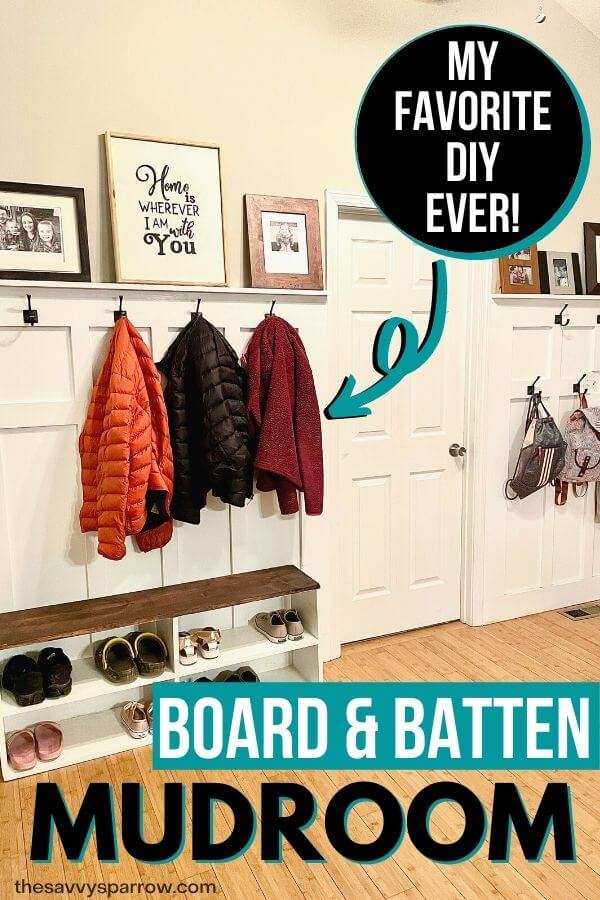
A DIY mudroom wall is a great way to turn any blank wall in your home into a functional storage space for backpacks, purses, and coats! Learn how to build a board and batten mudroom wall in just one day!
UPDATED: February 18, 2021
I LOVE a mudroom. And a DIY mudroom on a budget is even better! Seeing rows of backpacks, coats, hats, and umbrellas hung neatly in a row just makes me excited. And throw in a cute little bench with shoe storage… That’s what dreams are made of!
I knew that when we bought our home recently, I was missing out on not having a mudroom. The garage entrance to our house does pass through our laundry room, which is great…
The only problem is, there is barely enough room in the laundry room for our washer and dryer, let alone the mudroom of my dreams.
So, after using our dining room table as a coat/backpack catch all for way too long, I decided to take action and turn the two large blank walls in my entryway into a DIY mudroom wall with board and batten, plenty of hooks, and a picture ledge to display some family photos and this DIY canvas sign.
If you are in desperate need of some coat and backpack storage also, then here is how to build a mudroom on a blank wall:
DIY Mudroom Supplies
*This post contains affiliate links, which means if you click a link and make a purchase, I earn a commission at no additional cost to you. Read my full disclosure here.
Here is a list of the lumber you will need to replicate our mudroom wall:
- 1 x 2 boards – These boards will be the top picture ledge.
- 1 x 6 boards – We used 1 x 6 boards for the top, bottom, and outer edges.
- 1 x 4 boards – We used the 1 x 4 for the horizontal board that we used for our second row of hooks.
- 1 x 3 boards – These were the vertical boards in our board and batten mudroom.
The length of boards that you need will depend on the length of your wall and how tall you want your hooks to be on the wall. And don’t worry… I’ve got a handy graphic farther down in the post that shows exactly what boards we used in each position!
In addition to the lumber, you will need the following supplies and tools:
- saw to cut your lumber
- drill
- crowbar to pry off your baseboards (optional)
- stud finder (optional)
- wall anchors and screws
- wood screws
- paint of your choice
- wood filler
- caulk
- hooks
How to Build a DIY Mudroom Wall with Board and Batten
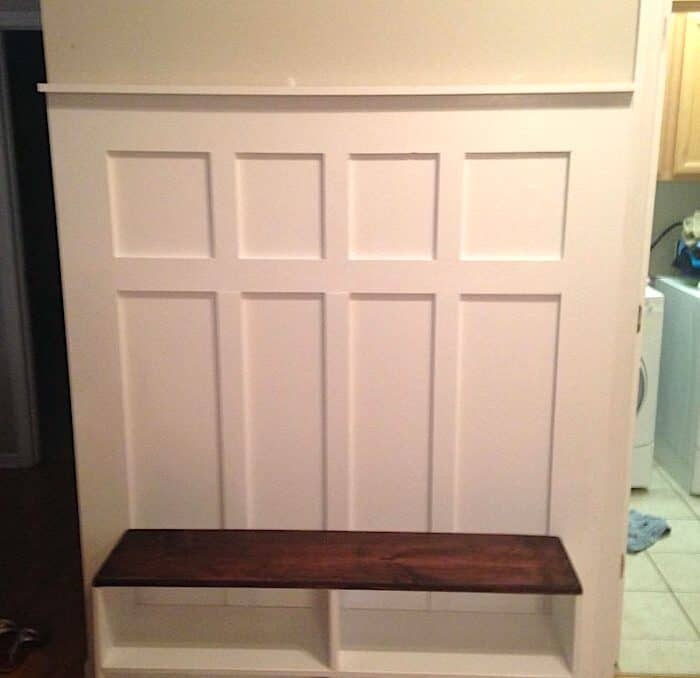
Before we jump into the step-by-step tutorial, let me show you what this wall looked like before:
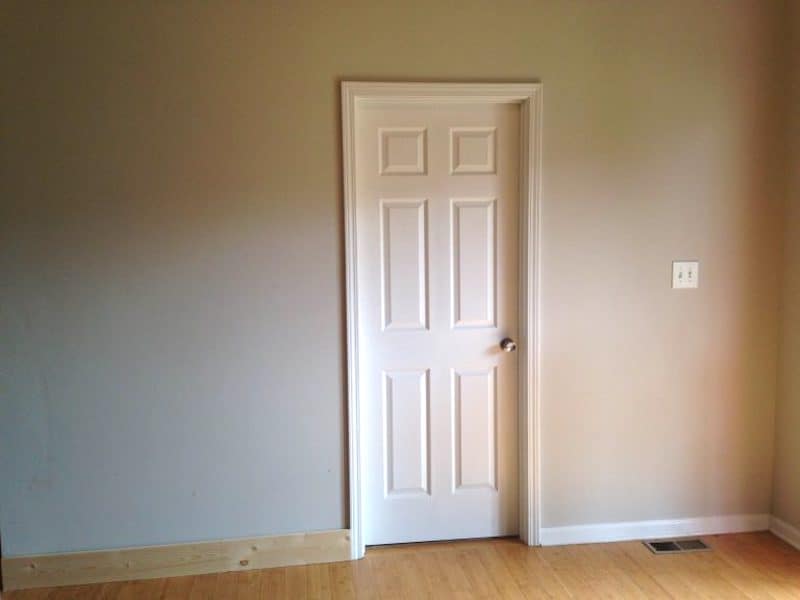
Our laundry room and garage are both through that door… And the natural light that you see on the right side of the photo is from our front door. So this was the perfect spot for a board and batten mudroom wall.
Okay, now on to the building plans:
1. Measure your walls, and do some math!
The initial planning was the most difficult part of this mudroom project, in my opinion. We had to figure out how many panels we wanted and how far apart they should be, as well as how tall we wanted the finished wall system.
I recommend that you do a rough sketch on some paper so that you have an idea on the height and spacing of your panels before you go to the hardware store. Then, once you get your lumber home, hold it up against the wall to judge what looks best in your space.
We chose our measurements by combining two key factors: 1) what was the most visually appealing and 2) what minimized our wood waste.
2. Remove the baseboards on your wall.
We decided to remove the baseboards for a more uniform and polished look, though I have seen photos of similar mudroom wall systems that used the existing baseboards. The top of our existing baseboards was more decorative and curved, which would have left a funny looking seam in between the base and the vertical boards so we removed them.
To easily remove your baseboards, use a crow bar and pry them off. Sounds simple because it is. Don’t worry about any paint chipping because you will be repainting the wall anyway.
3. Find and mark the studs.
Before you start putting up your board and batten, be sure that you find your studs so that you know where to attach the horizontal boards on your wall. These are the boards that will be holding your hooks, so they should be anchored in a stud if possible to be able to support the weight of heavier backpacks and purses.
4. Build the board and batten.
Measure and cut your lumber to size and attach it to the wall.
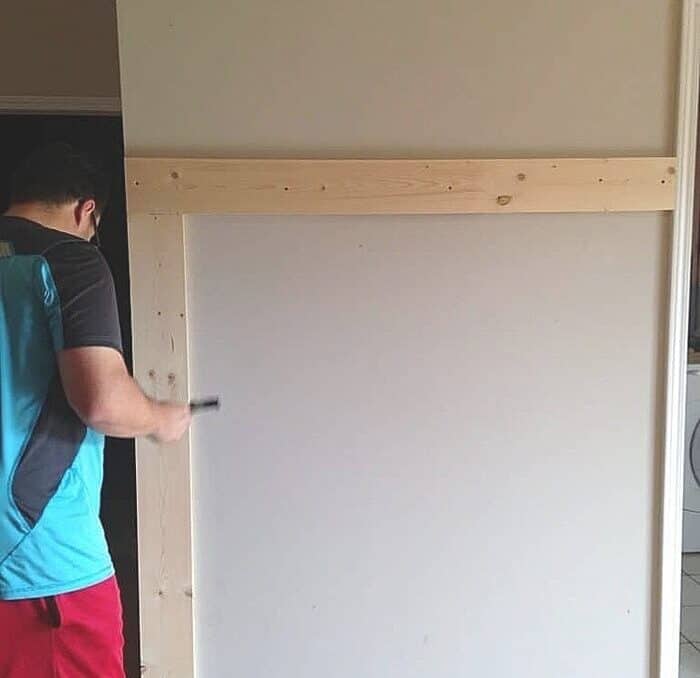
We chose to use wood screws rather than nails because we felt that the finished mud area would be sturdier.
Here is a diagram showing the lumber sizes that we used:
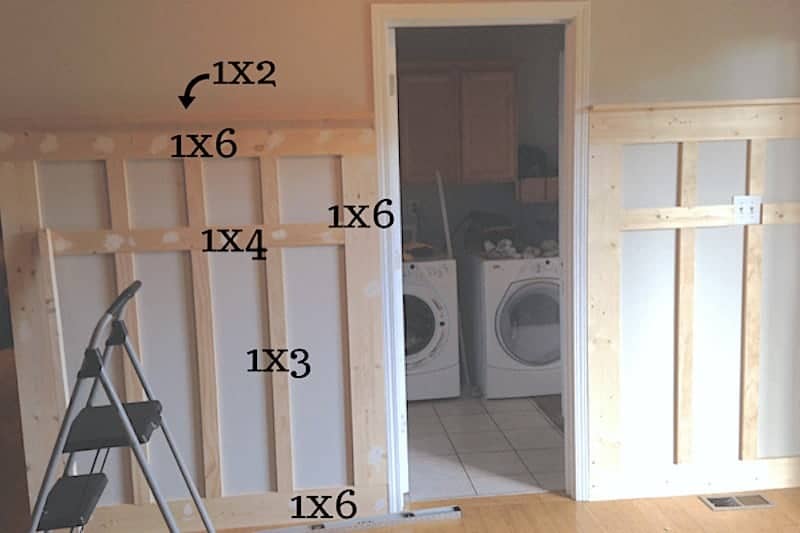
We used 1×6’s for the outside perimeter to give our finished wall system a grander, more polished look and to define each wall. The 1×2’s were turned on their sides and used for ledges to set family pictures on.
We just screwed straight down from the top to secure the ledge into the top of the horizontal board. You can see a close-up view of this farther down where I show you the hooks that we used!
5. Fill the screw holes with wood filler.
After all of your boards are on the wall, use wood putty to fill the nail and screw holes in the lumber according to package instructions. Allow the putty to dry, then sand over top of the putty to create a smooth finish. This is the wood filler that we used.
6. Caulk all the corners and seams on your mudroom wall.
Apply caulk to the insides of all boards (where the corner of the board meets the wall), as well as any seams. This will give your finished mudroom wall a more polished look.
7. Paint the board and batten.
When all of your caulk is dry, it’s time to paint the lumber and the wall.
We used Behr Premium Plus Ultra Satin Finish in the color Frost. *UPDATE – This paint has held up GREAT, even after 3 years of heavy use!
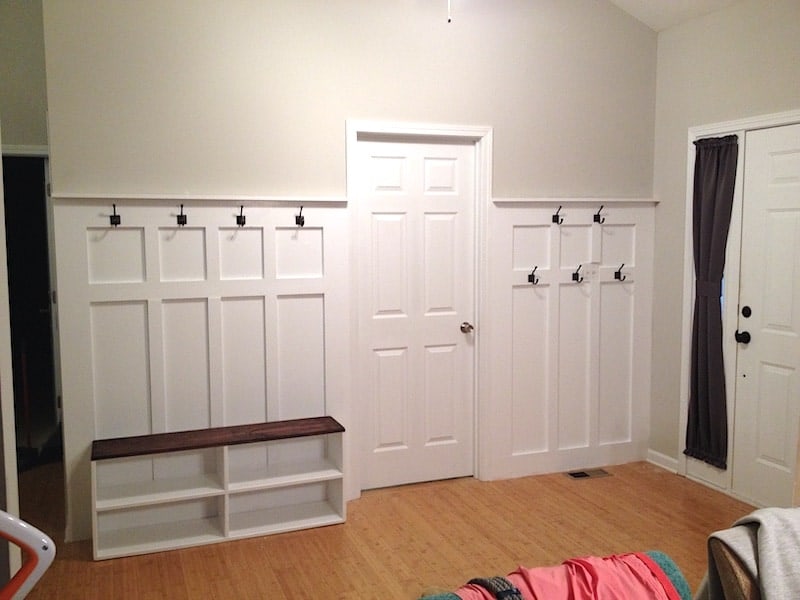
8. Add hooks to your DIY mudroom wall.
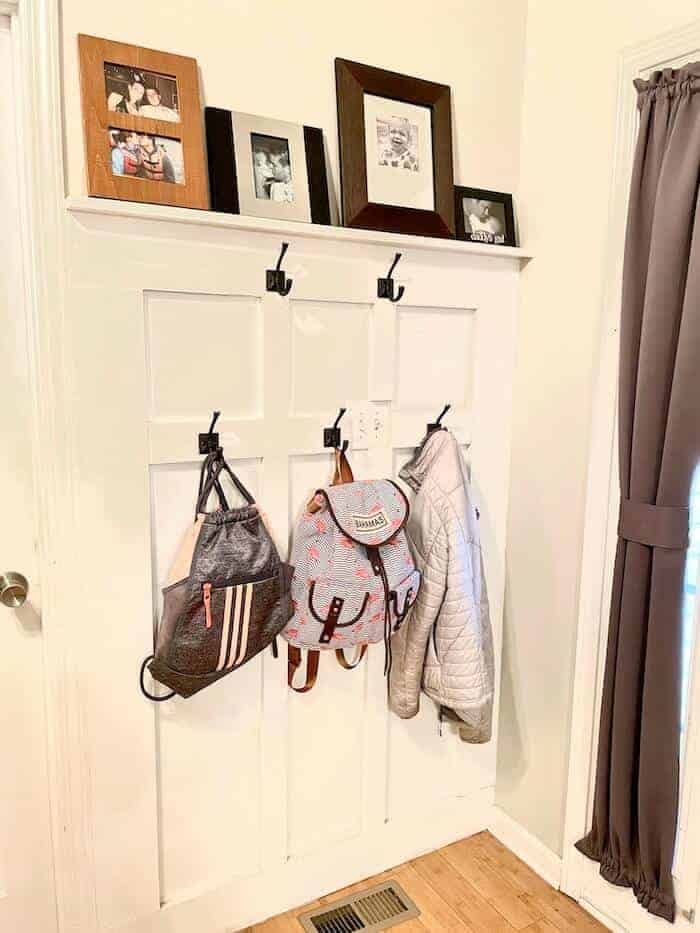
Once the paint is dry, it’s time to add your hooks. As a family of four, we have a TON of coats, backpacks, umbrellas, and sports bags, so we decided to do two rows of hooks on the right side of the wall. We only did one row of hooks on the left side, because we felt that a bottom row of hooks would be too close to the bench.
You can tell in the photo below that we staggered the two rows of hooks, so that the items hung on the top row would not be in the way of the hanging items on the bottom row.
This system has worked out GREAT for us! The few extra hooks at the top of the right side are the perfect height for hanging baseball caps and umbrellas.
Here is a close-up of the hooks that we used:
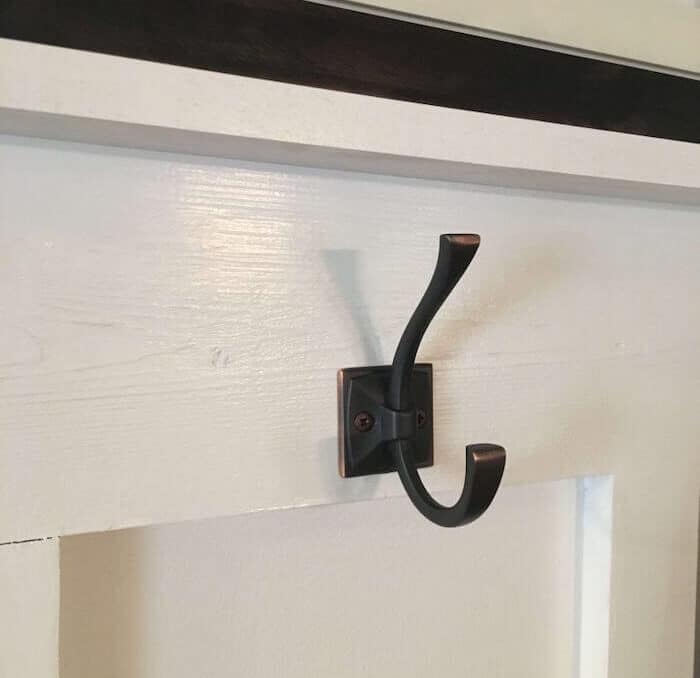
*Note – I really wish that we had looked for wall hooks on Amazon first! These came from Home Depot and they were WAY more expensive than some of the Amazon options. Plus, Amazon has the most amazing selection of the cool, industrial looking hooks also.
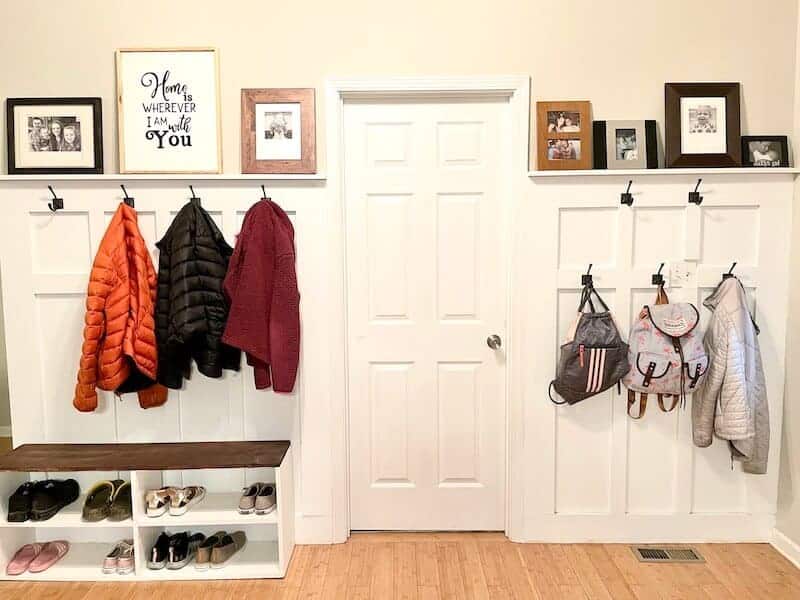
9. Enjoy Your New DIY Mudroom Wall!
And that’s it! Now it’s just time to hang up all of your stuff on your new board and batten mudroom wall!
Here are a few photos of the final project:
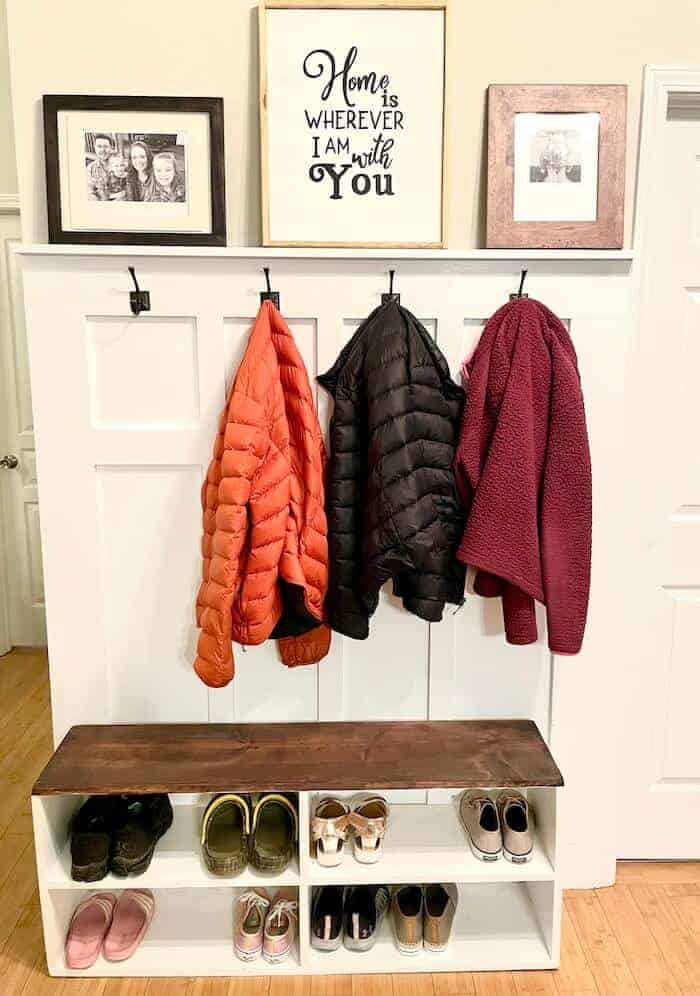
*Note – I have gotten some questions on how we built the bench… Unfortunately we didn’t take photos of the process, but it was super easy! This DIY shoe storage bench is similar to ours!
This whole wall system costs us less than $250! Not bad, considering all of the great storage we have now!
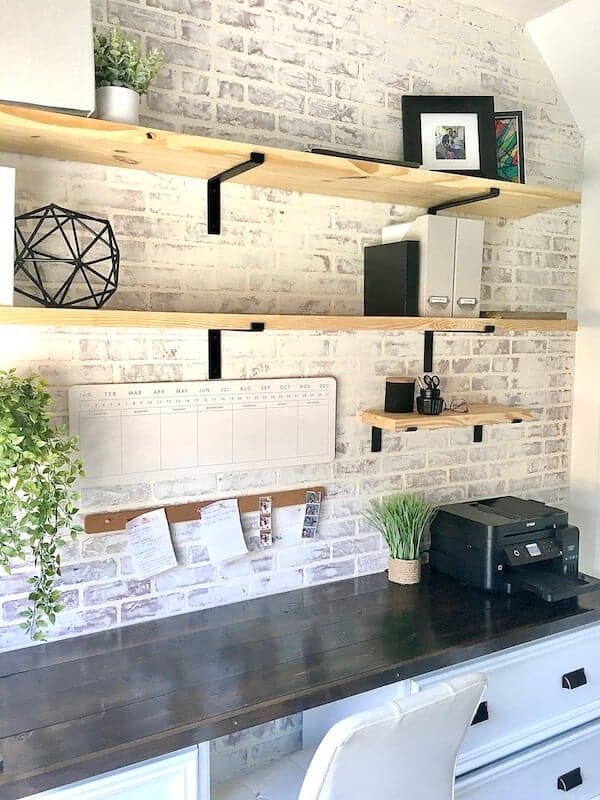
And, if you want another great option for your mudroom, instead of board and batten, try this easy DIY faux brick wall! I recently added this easy wall treatment to my office wall, and I am absolutely THRILLED with the result!
Hope you enjoyed this tutorial! And don’t be afraid to give this DIY mudroom a go. My husband is a novice when it comes to carpentry… so if he can pull this off, you can too!
And be sure to check out some of my other DIY home projects:
- Easy DIY Signs on Canvas – No Power Tools Needed! – This is the “Home is where ever I am with you” sign that’s in the photo above!
- How to Make a Wood Bead Garland – Easy Farmhouse DIY
- Cheap and Easy DIY Farmhouse Wood Signs – A Step-by-Step DIY Tutorial!


This makes for such a cute entryway! I love it so much! I am trying to plan our next home project & might have to try this. We are having our kitchen cabinets painted this week & I am already getting excited for the next haha. Thanks so much for sharing!!!
Hi – this is gorgeous and you inspired me to update my mudroom. Can you tell me what type of wood you used?
Did you ever get a response? I am curious about this as well.
Love your new mudroom. Can you please share the distance between the batten both vertically & horizontally? It looks so well balanced. How many inches up the wall did u put horizontal board & how many inches between boards?
Did you ever get a response? I am curious as well.
Hi Amy, I just ran across your Mud Room Wall on Pintrest and I am so happy that I did! Your instructions are so easy to understand and the pictures that go along with it, make it a cinch. I can’t wait to get started! I’m going to use a recycled piano bench with mine instead of building one.
Hi Karen! So glad you enjoyed the post! Good luck on your mudroom wall… it really is so easy to do, and it’s still to this day one of my favorite DIY projects that we’ve done! Thanks for the comment. 🙂
Did you use the same satin finish paint on both the battens and plastered wall.
Hi Karla! Yes, we used the same paint for both so that it matched… the same exact color paint but in different finishes (like one eggshell, one satin) can look super different – we learned that the hard way trying to patch a hole in our living room wall. I also find that the satin is easier to clean with a damp rag, and since it’s a mudroom wall, it can get dirty. 🙂
Any ideas m how to do this on an angle wall? I want to try it on my stairwell wall – first level angled wall.
Hi Sara! I would search DIY board and batten on stairs on YouTube or Google… I’m sure that it involves measuring up the wall a certain distance from the floor at both the top and bottom of the stairs, and then running a chalk line to make sure you get the top board for the board and batten perfectly even. We actually did some trim work that is about 12″ tall on our stairwell, similar to how you would do board and batten, but I don’t have a tutorial for that. One thing to take into account – you will probably want to space your hooks farther apart, and you may want to put them up higher on the wall so they don’t get in the way as you’re walking up. Good luck! 🙂
If you caulk after you paint you will unfortunately find that in time the caulk will have turned grey and will look dusty. You should always paint over the caulk even if you are painting white paint. Your wall mudroom is very good. Sherry
Hi Sherry! Great tip! This is the very first home project that we ever did, so we’ve definitely learned a lot since then. 🙂 Thanks for your comment!
Hi There! I love this tutorial. You just gave me a great idea for a weekend project! I’m curious about the bench though. Did you all make that as well? Can you share the steps you took to make the bench? I’m a single mom of 4 boys. The boys want to get in to woodworking so I’ve been building up a tool collection for them. I would love to let them help me with this project, so I’m wondering if I have the proper tools to build the bench as well.
Hi Shala! Yes, my hubby made the bench as well… unfortunately sometimes he doesn’t have the patience to write down the exact steps and let me take photos and videos of the work in progress. 🙂 So, I don’t have an actual tutorial for it… He used a table saw, a sander, and a drill to build it. All of the boards are 1″ x 12″. The sides were screwed in on both ends through the bottom (so that less screw holes are visible from the sides). And the top board (bench part) was screwed in through the top and into the tops of the sides. Sorry, it’s really hard to explain without actual pictures! Maybe I can have him recreate the bench so that I can do a full tutorial for it. If your boys are interested in woodworking, they should definitely try the DIY mudroom wall, though… It is one of the MOST used items that my husband has built!