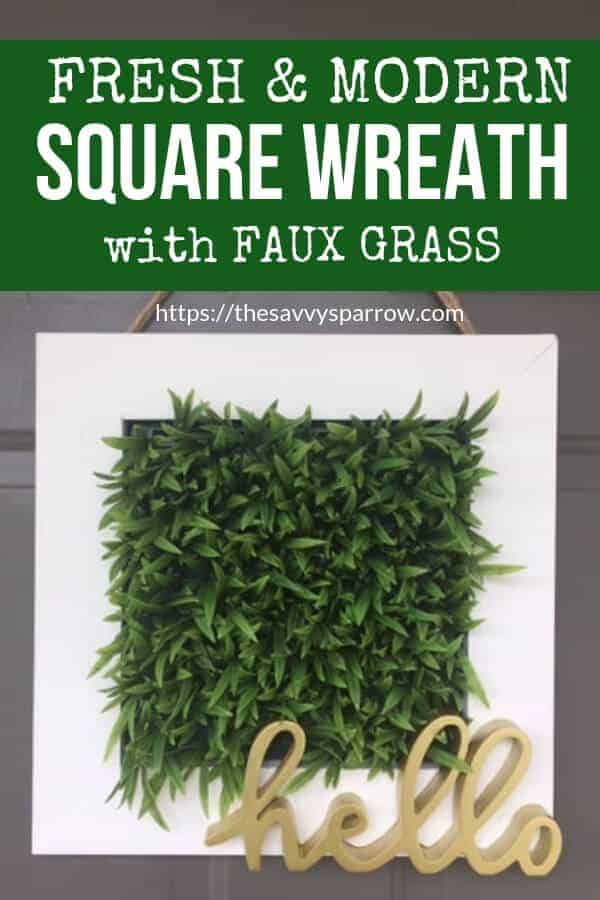
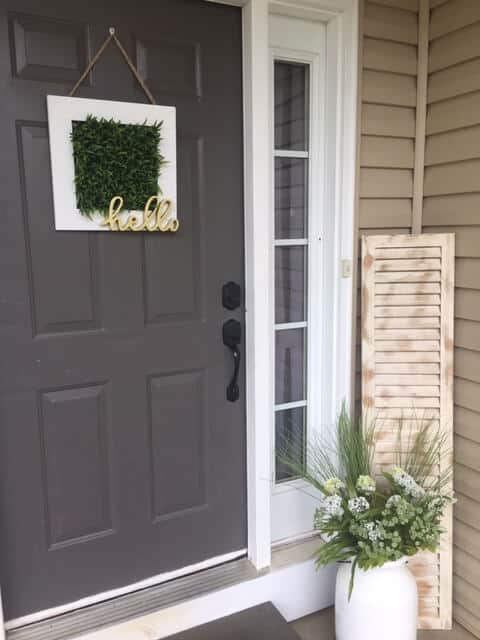
Want to dress up your front porch decor for Spring? Try this super cute DIY square wreath!
I was at Michael’s recently “oooh”-ing and “aaah”-ing over the fake grass. Strange, I know.
I am drawn more to the simple greenery for spring decor instead of tons of flowers. So when I saw the little squares of perfect fake grass, I knew that I had to incorporate them into a DIY square wreath for my front porch decor.
So I threw it in my buggy without a plan (but with a 50% OFF coupon!).
I got my square of grass home and started digging through our scrap lumber pile, and with my husband’s help, this beautiful DIY square wreath was born:
And Mama fell in love. 🙂
The best thing about this DIY square wreath is that you can use it all year, since it doesn’t have any seasonal embellishments. And, I love how clean, fresh, and modern it looks.
Click here to check out another one of my DIY wreaths that can be used all year long!
Want to make your own fresh and modern wreath? Check out my tutorial below! And don’t think that you can’t make this super cute wreath just because you don’t own a saw! You can use a pre-made square picture frame if you don’t want to break out the power tools.
*This post contains affiliate links, which means I may earn a small commission from these links at no additional cost to you. Read my full disclosure here.
How to Make a DIY Square Wreath
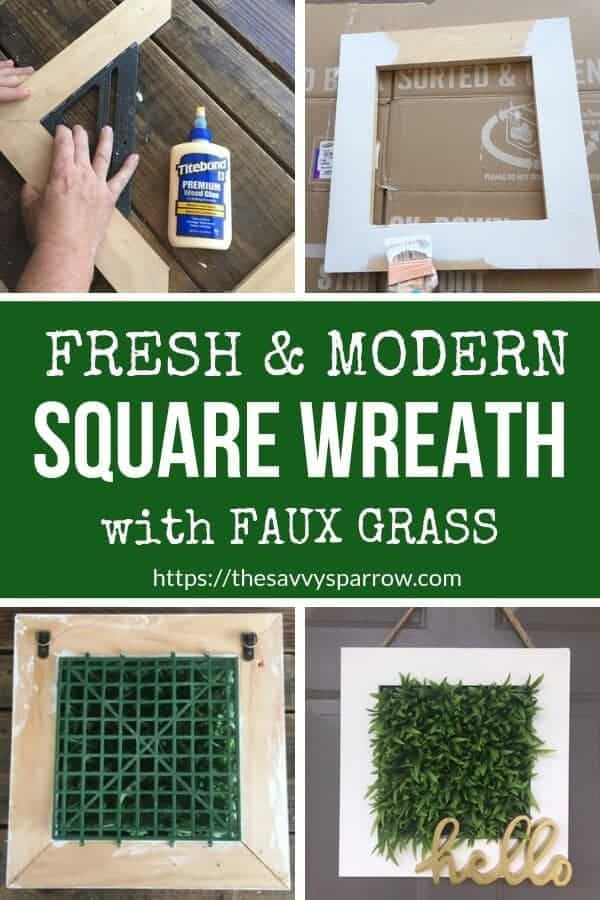
Step 1: Gather Your Supplies
We built our wreath frame from scratch. However, if you can find the right-sized premade frame or trim down your grass square, then you can save a bunch of steps and supplies.
Here’s what we used to make our wreath:
- 1 x 3 lumber
- Wood glue (we used this kind)
- Wood putty
- Sand paper
- Super glue (we used this Gorilla Glue)
- Nail gun and nails (or a hammer and nails would work just fine)
- Compound miter saw
- White paint
- Fake grass square (ours came from Michael’s)
- Wooden “hello” sign (ours came from Big Lots)
- Large metal clamp
- Picture hangers
- Jute rope
Step 2: Build Your Frame (or skip down to Step 3 if you have a pre-made frame)
To build a frame like ours, follow these steps:
- Measure your fake grass square so that you know what the finished dimensions of your frame need to be
- Using the 45 degree setting on your saw, cut your 1 x 3’s to the correct size to fit your grass square
- Lay your cut 1 x 3’s out and use a speed square to check that they line up properly
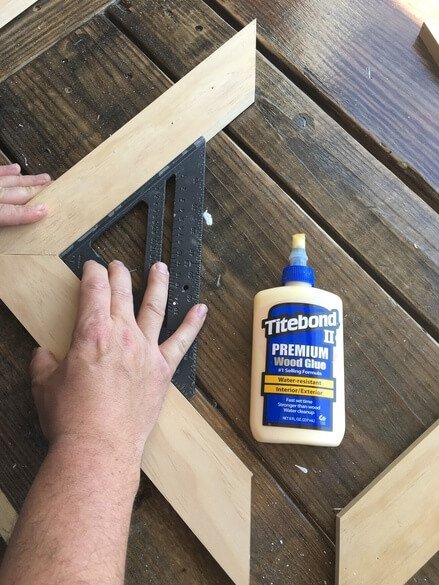
- Apply wood glue to hold the frame together – allow the wood glue to dry before moving on
- Nail the frame together from the sides using finishing nails for added support
- Use wood putty to fill in any corner seams on the frame
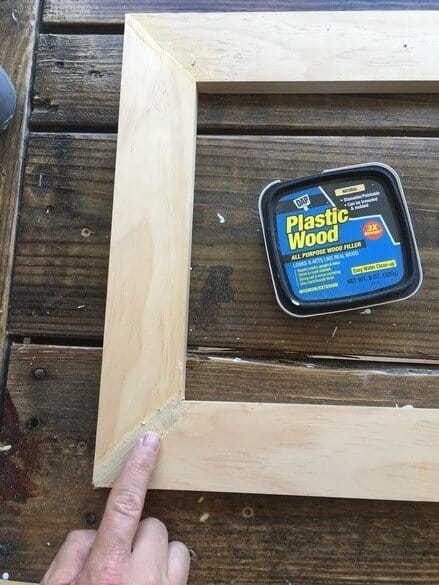
- Sand over seams for a smooth finish
If building your own frame sounds daunting, or if you don’t know a miter saw from a jigsaw, then look for a pre-made square picture frame and just remove the glass and backing.
I have seen lots of different square frames at Hobby Lobby and Michael’s that would work perfectly for this DIY square wreath.
Step 3: Paint Your Frame
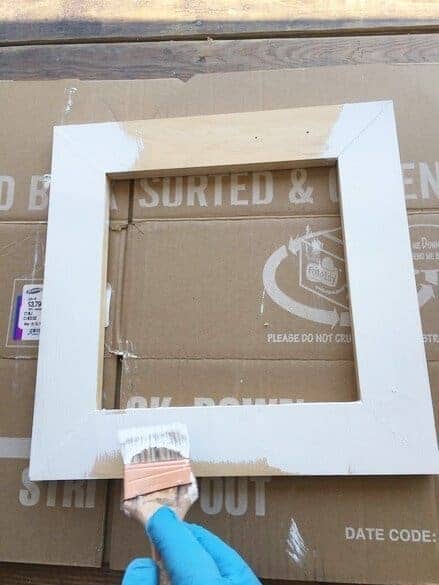
We used a basic white latex paint that we already had on hand. If you are using a pre-made frame, you may need to sand it a bit or apply a primer before painting.
Step 4: Attach your fake grass square and picture hangers
We used small screws to attach our grass, but you may need to use nails if you are using a pre-made frame that is not as thick.
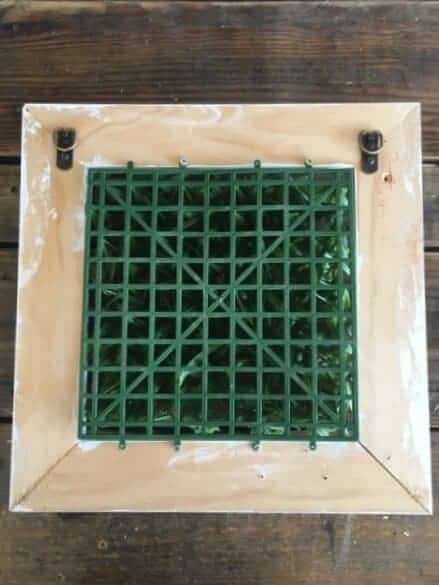
The fake grass square has little holes around the edges that are perfect for this DIY square wreath. Just screw or nail the grass to the back of the frame using these holes. A good staple gun may work also.
Step 5: Attach your “hello” sign
My hubby found our cute, gold “hello” at Big Lots, and it is pretty thick (about 1 inch). If your “hello” is thinner or lighter, then you may be able to attach it using a hot glue gun.
Ours is pretty heavy, so we used this glue.
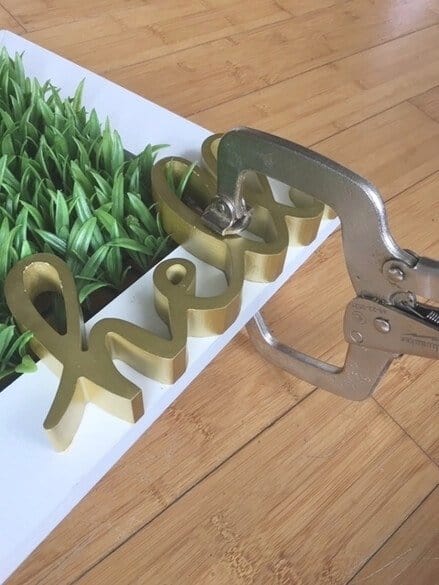
We glued the “hello” to the frame, and then used a metal clamp to hold it tightly in place while the glue fully dried.
Step 6: Attach jute rope and hang your DIY Square Wreath!
Just string some jute rope through your picture hangers, and you’re done!
I love the pop of fresh green color that this wreath adds to my front porch decor!
And, if you love this DIY decor tutorial, then check out some of my other fun and easy DIY projects:
- How to Make a DIY Front Porch Fall Sign
- How to Paint Faux Subway Tile – A DIY Fireplace Remodel
- The Cheapest and Easiest Way to Make Farmhouse Wood Signs