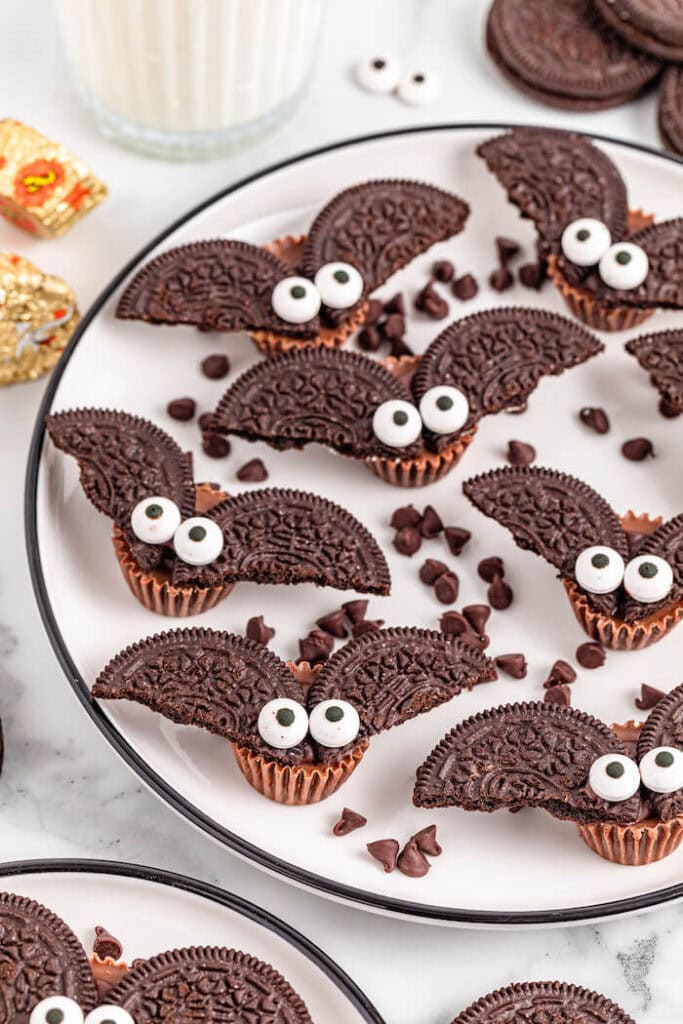
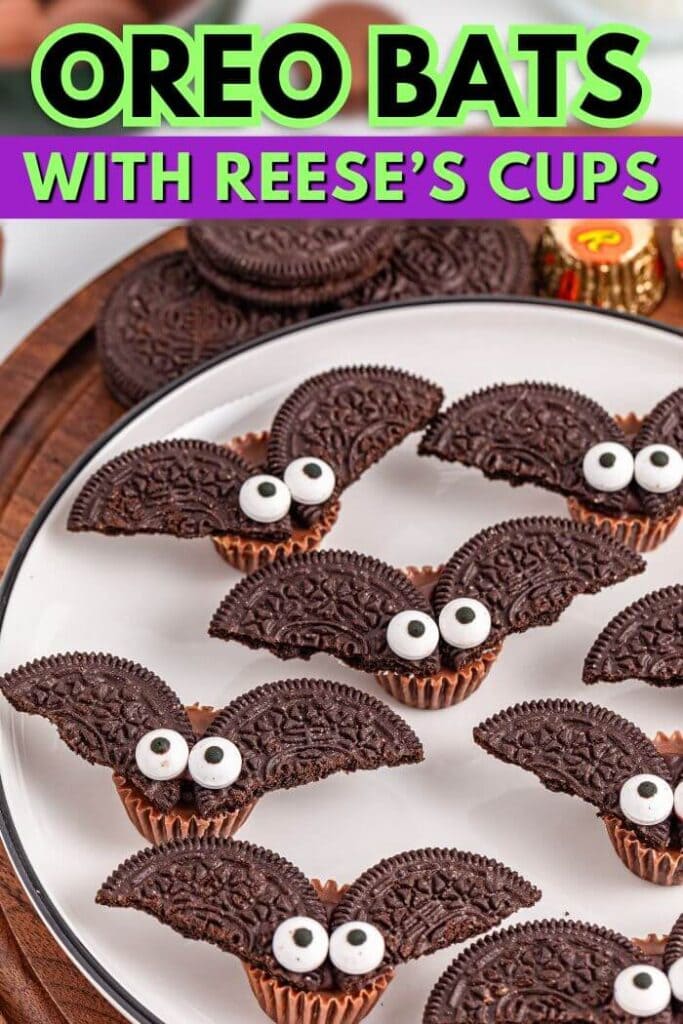
These Oreo bats made with miniature Reese’s peanut butter cups and Oreo cookies are a delicious and cute sweet treat for Halloween! With a few simple steps and easy to find ingredients, these bat treats are the perfect spooky snack!

My two daughters and I take our sweet treats very seriously. Whether it’s a midday ice cream run to beat a “case of the Mondays”, or an impromptu trip to our local grocery store for their chocolate chip cookie cake.
And we especially love any kind of holiday-themed treat.
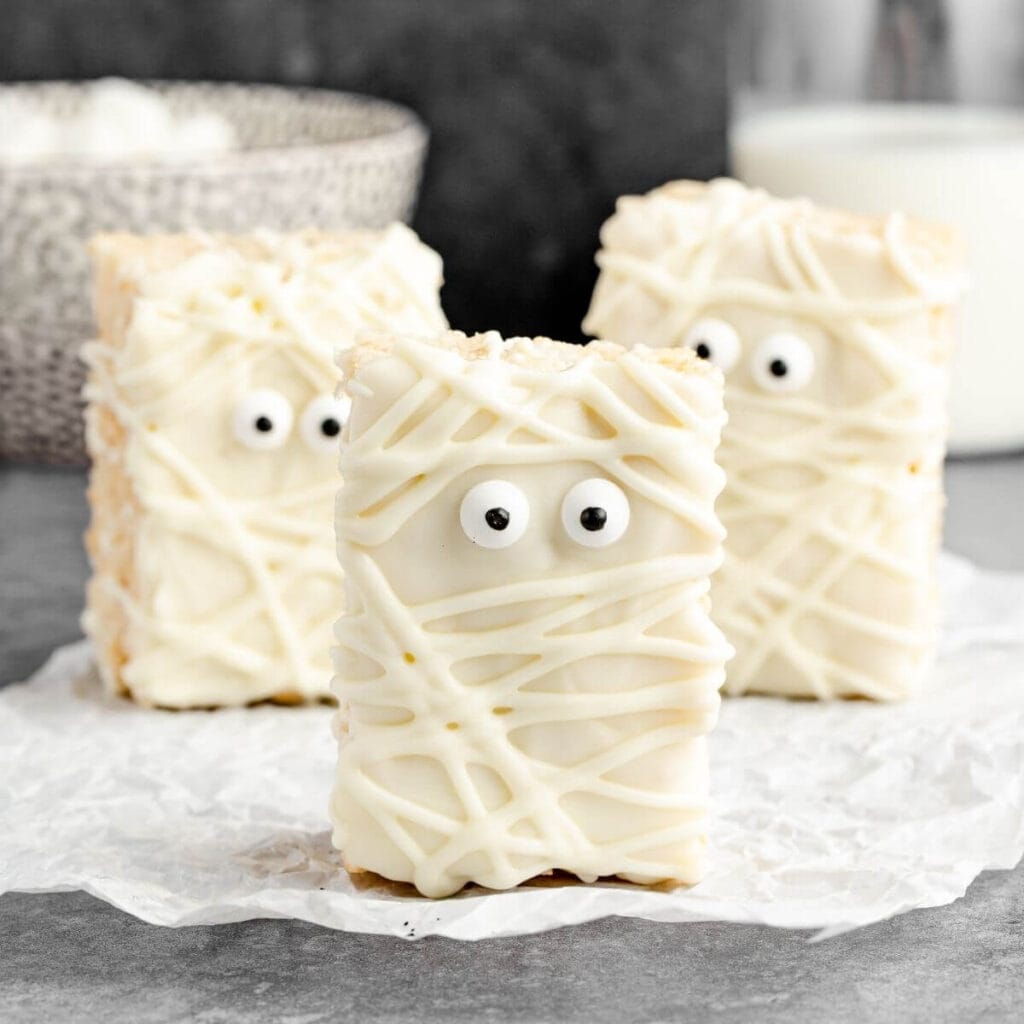
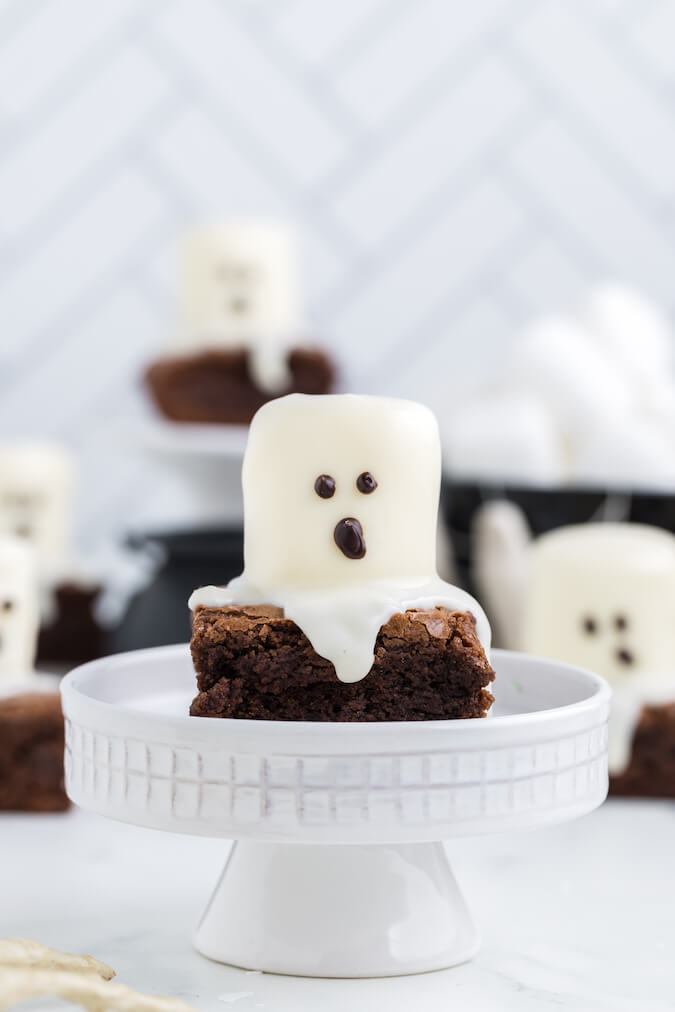
So when Halloween rolls around, the holiday for those of us with a major sweet tooth, we get extra excited to make all of our favorite ghoulish treats like these marshmallow ghost brownies or mummy Rice Krispies treats… because a pillowcase full of fun-size candy bars on Halloween night just isn’t enough!
And our newest obsession is these super cute Reese’s Oreo bats, made with not one, but two popular chocolate treats – Oreo cookies and miniature Reese’s peanut butter cups.
These scrumptious Oreo bats are almost too cute to eat (almost!), and they’re the perfect Halloween treats for your kids’ classroom parties, a Halloween buffet table, or just a fun late October snack!
Why You’ll Love These Halloween Treats
- Perfect For Halloween Events. These fun and simple Halloween bats are the perfect sweet treat for any Halloween party, whether it’s your annual costume bash or your daughter’s scary movie slumber party.
- Fun and Easy to Make with Your Kids. Your kids will love decorating the spooky bats, and they’ll love sneaking an Oreo or two also!
- Common Ingredients. These Oreo Bats use ingredients that are easy to find… you may even have most of the needed supplies in your pantry already!
- Reese’s Cups and Oreos… What’s Not to Love? These Reese’s Oreo Bats are made with the two most delicious chocolate treats – Reese’s peanut butter cups and Oreo cookies!
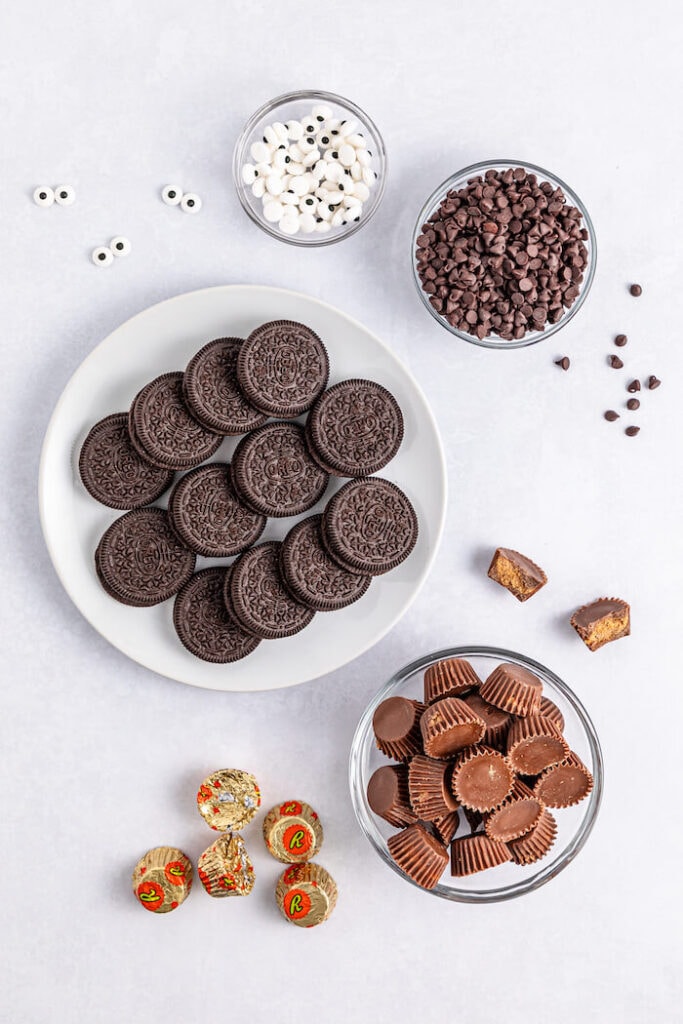
Ingredients
- Oreo Cookies. Don’t worry about the flavor of the filling inside of the Oreo because during the assembly process the filling will get scraped out anyway. I like to stick with classic Oreos.
- Unwrapped Reese’s Cups. The miniature Reese’s cups are preferred for these Reese’s Oreo Bats, though you can also use the larger peanut butter cups for a bigger treat.
- Semi Sweet Chocolate Chips. These will serve as the glue for your Oreo Bats, holding them together.
- Candy Eyeballs. These candy eyeballs are often available in the baking section of your local grocery or craft store.
Recipe Notes:
- Be careful not to burn the chocolate. When melting any kind of chocolate, my go-to strategy is to microwave the chocolate in 20-30 second increments, stirring in between each cycle. This prevents the chocolate from burning.
- Miniature peanut butter cups look best. Because of the size of the Oreo cookie “wings” in relation to the bat’s “body”, I recommend using miniature peanut butter cups.
- Have the ingredients prepped before melting chocolate. Unwrap the Reese’s and prep the cookies before heating the chocolate. Once melted, the chocolate will start to harden back up, so time is of the essence.
- Ziploc bags make perfect piping bags. If you don’t have a piping bag, a Ziploc Bag is a perfect alternative. Simply snip a hole in the corner of the bag once all of the melted chocolate is poured in, and there you have a DIY piping bag!
How To Make Halloween Oreos Bats With Reese’s
Step 1: Prep The Oreos
Start by preparing the Oreo cookies to look like bat wings. Separate the Oreos into two chocolate wafers, taking care to not break the cookies. Then, scrape the cream filling from both sides.
Cut the cookies in half to make the wings. I recommend using a serrated knife for this instead of breaking the cookies by hand, because the cut will be more precise and your finished treats will look better.
Step 2: Melt the Chocolate
Pour the semi sweet chocolate chips in a microwave safe piping bag and microwave for 30 second increments until the chocolate is fully melted. To ensure that the chocolate is evenly melted, you can massage the piping bag in between every microwave increment.
After the chocolate is melted, allow the piping bag to cool for 2-3 minutes before you begin assembling the Reese’s peanut butter cup bats.
Step 3: Assemble The Oreo Bats
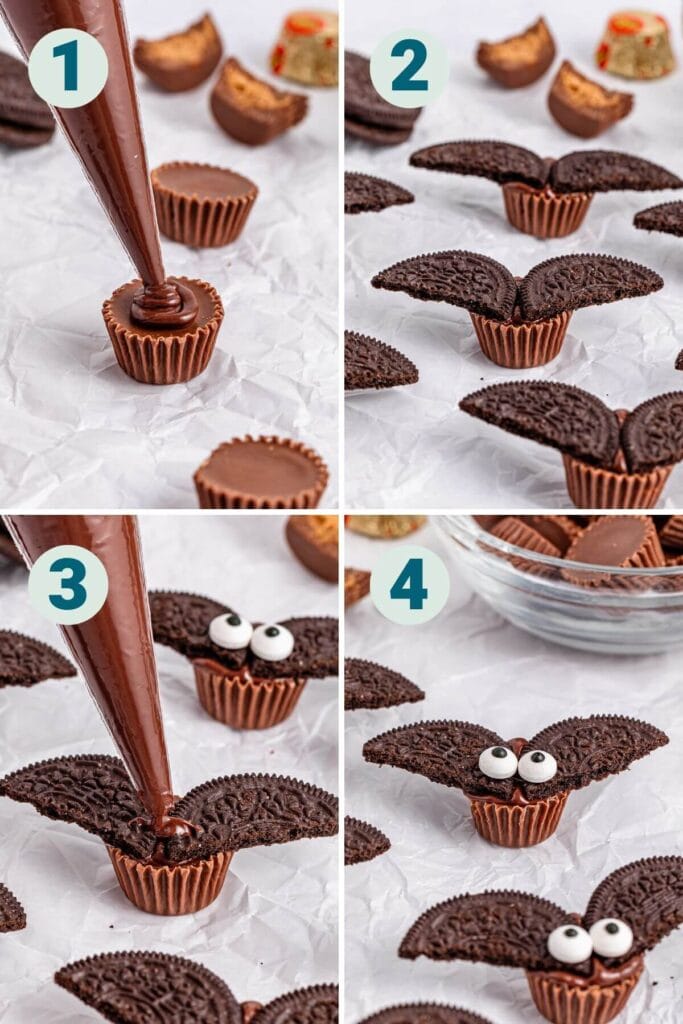
Place the Reese’s peanut butter cups evenly spread out on a baking tray with parchment paper, and begin to pipe a small bit of chocolate where you want your Oreo cookie bat wings to go.
To make sure the chocolate doesn’t harden before you get a chance to secure your bat wings, quickly place your cookie halves on the Reese’s cup and hold them in place for a couple of seconds. Doing this ensures that the Oreo bat wings won’t slide off of the Reese’s base.
Pipe a thin line of chocolate in between each cookie and place two candy eyes to complete the Reese’s Oreo bat treats.
And then your cute Halloween snacks are ready to be served!
These Oreo bats would look perfect on a Halloween platter alongside these other spooky treats:
Mummy Rice Krispies Treats – Made with your favorite cereal treats recipe and melted white chocolate!
Marshmallow Ghost Brownies – Classic boxed brownies get a spooky makeover with large marshmallows and white chocolate… the perfect Halloween party dessert!
Oreo and Reese’s Bats Recipe

Halloween Oreo Bats with Reese’s Cups
Ingredients
- 12 Oreo cookies
- 24 miniature Reese’s cups (unwrapped)
- ½ cup semi-sweet chocolate chips
- 48 candy eye balls
Instructions
- Prepare the Oreos. Separate the Oreos into two cookies, taking care to not break them. Scrape the cream filling from both sides. Cut or break the chocolate cookies in half. Using a serrated knife to cut the cookies in half is recommended.
- Prepare the Reese's cups. Unwrap the miniature Reese's peanut butter cups. Set the cups on a parchment paper lined baking sheet, spaced out to be able to decorate the bats.
- Melt the chocolate. Pour the semi sweet chocolate chips into a microwave safe piping bag. Microwave for 20-30 second increments on a low to medium heat setting until the chocolate is fully melted. To ensure that the chocolate is evenly melted, you can massage the piping bag in between each increment. Once melted, allow the piping bag to cool for about 2-3 minutes before snipping off a small tip.
- Assemble the Oreo bat wings. Pipe a small bit of chocolate in the center of a Reese's cup where you want your Oreo cookie bat wings to go. Working quickly before the chocolate hardens, place the cookie halves on the Reese's cup and hold them in place for a couple seconds while the chocolate sets up a bit. Repeat for all of the cookie "wings".
- Add the candy eyes. Pipe a thin line of chocolate where the corners of the halved cookies meet (on top of the Reese's cup). Immediately place two candy eyes on the chocolate. Repeat for the remaining Oreo bats.
- Cool and serve. Allow the Oreo bats to cool completely before serving, or transfer the baking sheet to the fridge while the chocolate sets up. Serve and enjoy!
Notes
- Have extra Oreo cookies on standby just in case any of the cookies break while you are trying to separate them.
- Holding the Oreo cookie wings in place for a couple of seconds helps them to not slide off the Reese's cup base.
- If you don't have a microwavable piping bag, you can use a Ziploc bag. Simply snip one corner tip of the bag once all of the melted chocolate is poured in, and there you have a DIY piping bag! You can also use a toothpick or skewer to add melted chocolate where you need it.
- Storage – Store leftover bats in an airtight container on the counter for up to 1 week.
Nutrition
The nutrition facts provided are calculated using a third-party tool and are estimates only. Actual nutritional content may vary based on the ingredients and brands you use, as well as portion sizes. For accurate results, please consult a registered dietitian or nutritionist.