
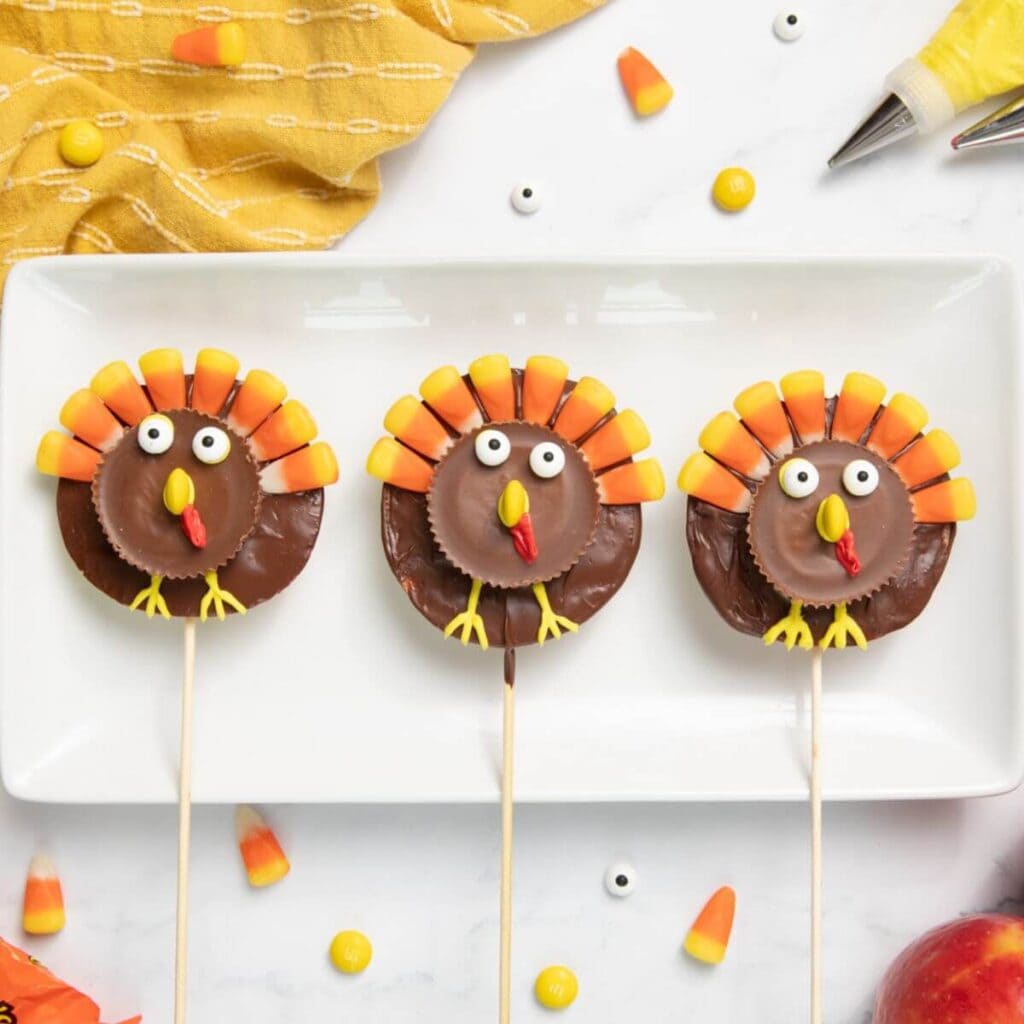
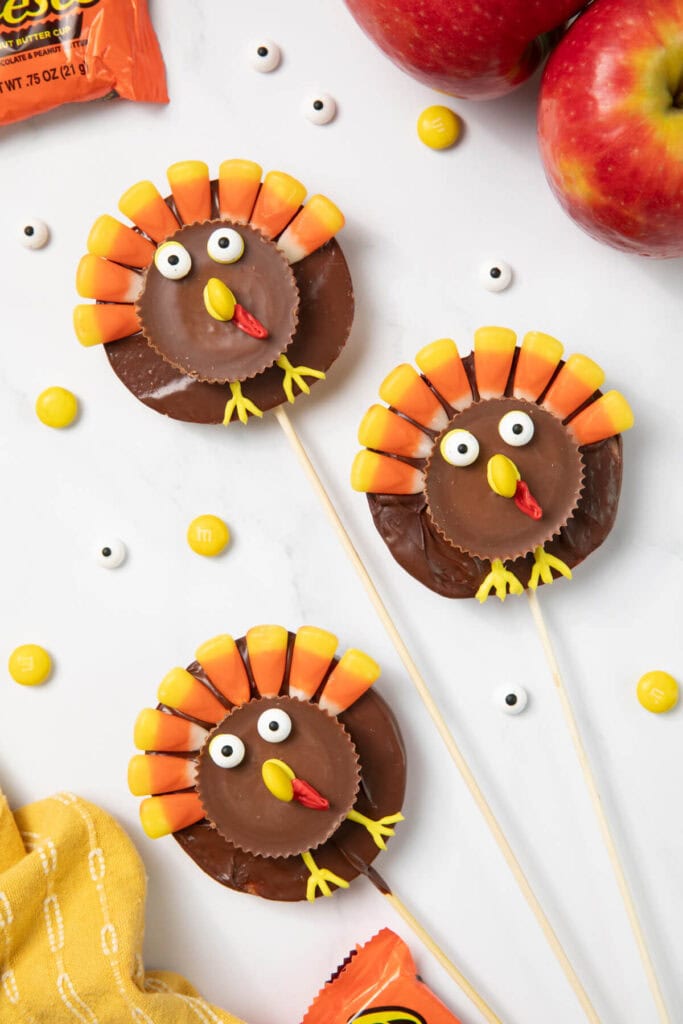
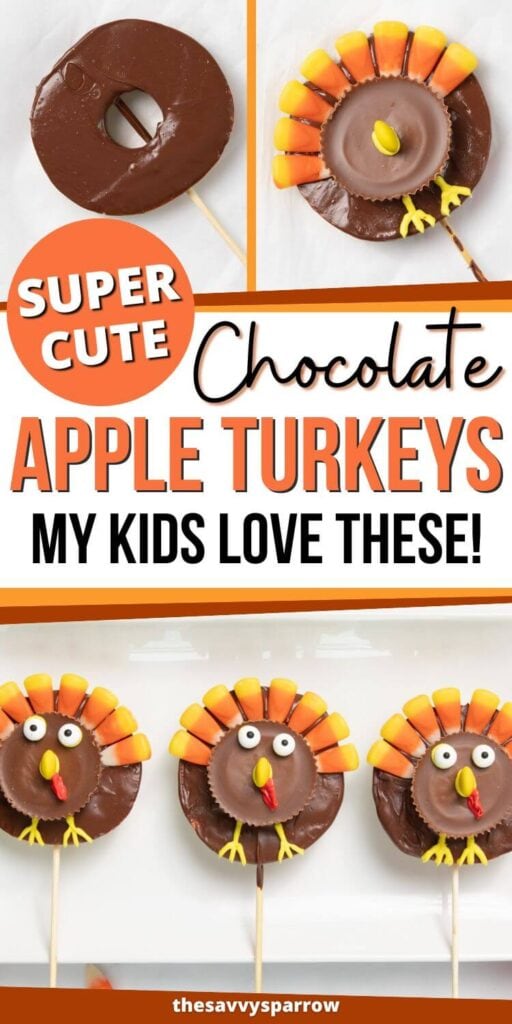
If you’re looking for fun and cute Thanksgiving snacks for kids, then look no further! These chocolate apple turkeys are made with apple slices and decorated to look like turkeys. The perfect treat to celebrate Thanksgiving with your little ones!
You know the old saying, “An apple a day keeps the doctor away”? I wonder if that applies to apples dipped in chocolate? I think yes!
Something about the combination of apples and candy just speaks to my dessert-loving heart. Whether it’s candy apples, caramel apples, or chocolate-dipped apples, I LOVE them all!
So when I had the idea to make these cute chocolate turkeys with apple slices for “the kids”, it was really for my own benefit, too!
Make a batch of these chocolate turkey apple slices to serve as Thanksgiving dessert for kids, or take them to your child’s classroom Thanksgiving party. Just cut some apples, melt some chocolate, and decorate for super cute turkey treats for kids! My kids LOVE them, and I’m sure yours will too!
Ingredients for Chocolate Apple Turkey Treats
Here’s what you need to make these cute turkey treats:
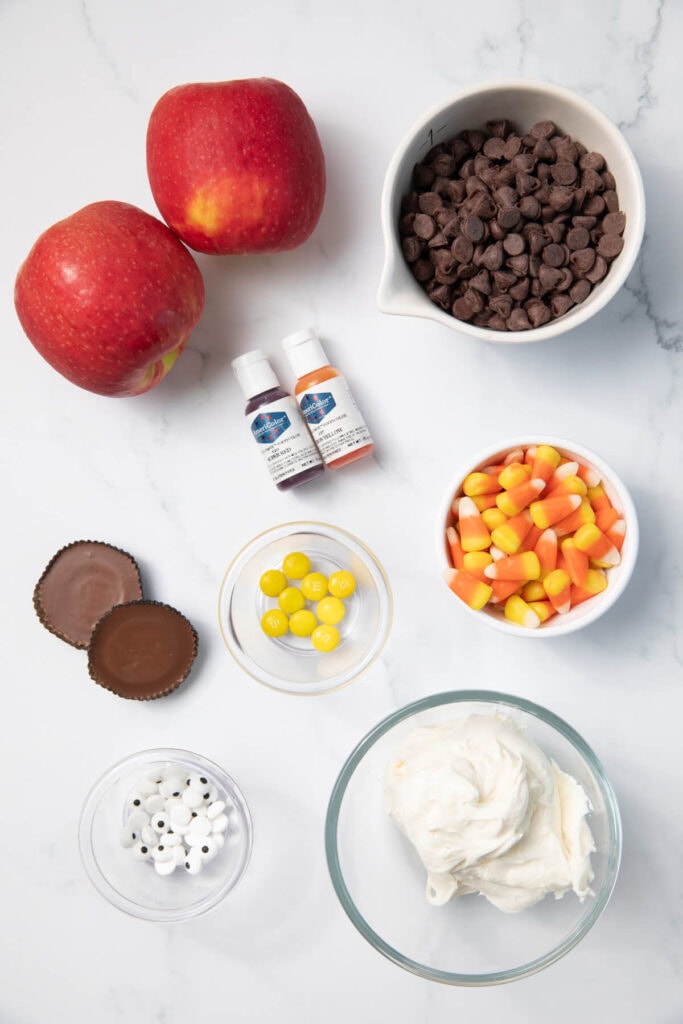
- one can of store-bought frosting – Use your favorite brand. You will only need a small amount for the decorations.
- red and yellow gel colors to tint your icing – Divide your icing in half and tint one half red and one half yellow.
- one bag of semi-sweet chocolate chips – I don’t recommend using milk chocolate because I find that it doesn’t harden as well as semi-sweet.
- yellow M&Ms
- candy corn
- large Reese’s Cups – Be sure to buy a few extras! Some of mine were not so pretty when I unwrapped them because the chocolate had gotten stuck to the top of the wrapper.
- candy eyeballs
- wooden skewers (optional)
How to Make Chocolate Turkeys with Apple Slices
These adorable Thanksgiving treats are easy to make and fun to decorate! Here’s how to make these cute turkey snacks with your kids:
Prep the Apple Slices
Start by cutting your apples into slices that are about 1/2″ thick. Be sure to cut the apple horizontally across, so that the core is in the center. Then, use a small round cookie cutter, the large side of an icing piping tip, or a paring knife to cut the core out of the center. *Don’t worry if your circle isn’t perfectly round – the hole will be covered by a Reese’s Cup so you won’t see it.
Your apple slices should look something like this:
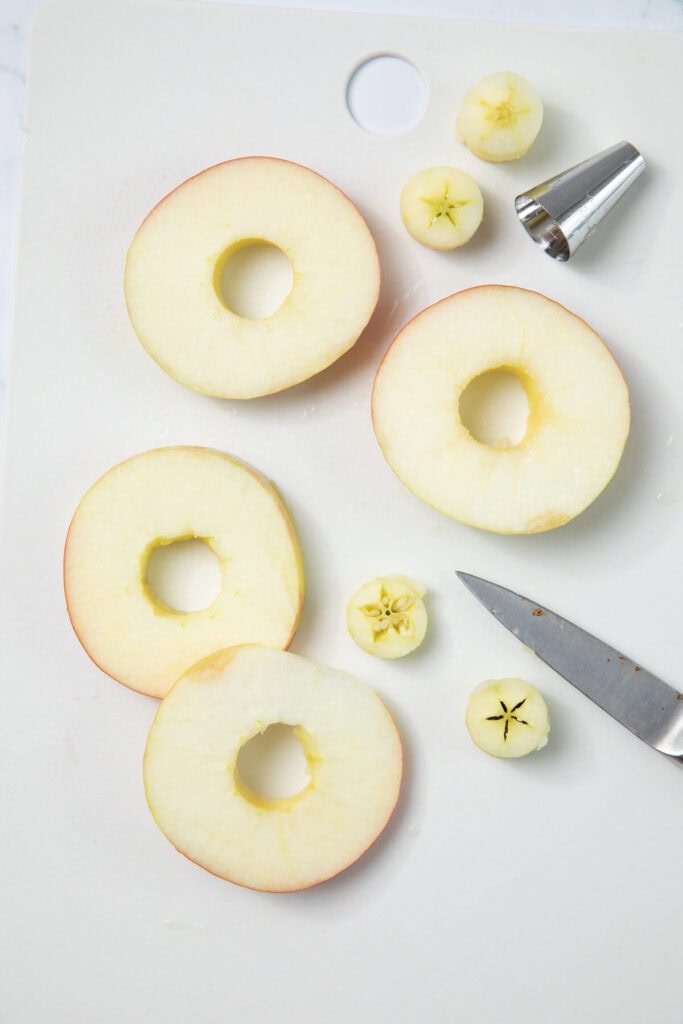
*TIPS – I used Honeycrisp apples because that’s the apple variety that my kids prefer. Honeycrisps are crisp and firm and can stand up to the heat of the melted chocolate, so they’re great for these chocolate turkey treats. When cutting your apples, be sure to not cut the slices too thin because they could break in half.
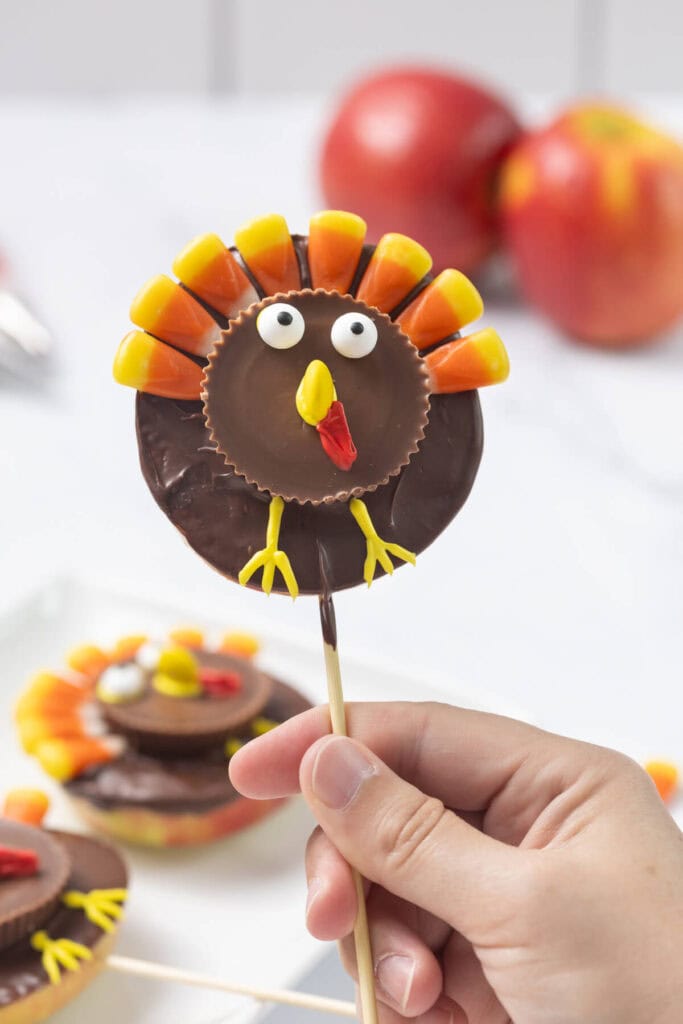
OPTIONAL – If you want to create more of a lollipop-style turkey treat for your kids, then you can break a wooden skewer in half and insert the pointed end into one side of the apple. That way kids can hold the stick while they enjoy the chocolate covered apple.
Color the Icing
Divide the canned frosting into two small bowls. Use the gel food colors to tint one bowl bright yellow and the other bowl red. Transfer the colored icing to icing bags with a fine piping tip.
Melt the Chocolate Chips
Add the chocolate chips to a microwave-safe bowl and heat in 30 second increments, stirring in between, until fully melted. Be careful to not burn the chocolate!
Decorate the Chocolate Covered Apple Slices
When all of your ingredients are prepped, it’s time to decorate the apple slices to look like turkeys. Just follow these simple steps:
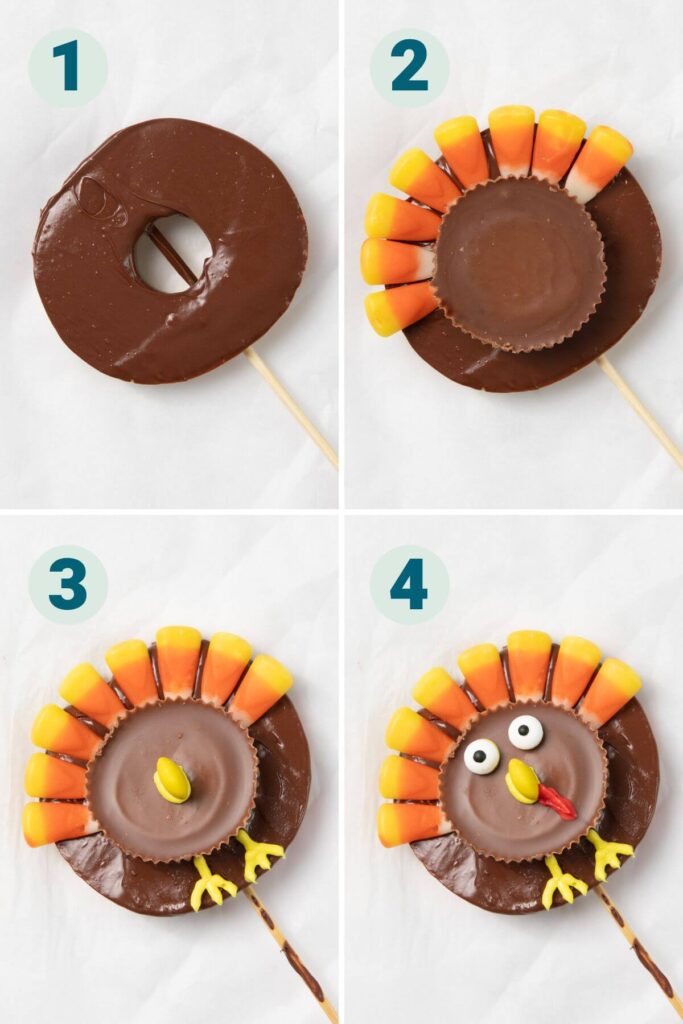
- Dunk one side of the apple slice into the melted chocolate, until the entire top is covered. I didn’t coat the entire apple slice front and back, because I didn’t want it to be chocolate-overload.
- Before the chocolate has a change to set up, add one large Reese’s Cup over the center hole and place the candy corn around the top half of the Reese’s to look like turkey feathers. Place the candies quickly – the melted chocolate will act as a glue to keep your decorations in place.
- Using a very fine piping tip, add yellow feet to your chocolate apple turkey. Then, use a small dot of yellow icing to place a yellow M&M on its side sticking straight up to look like a beak.
- Use the red icing to pipe on the turkey’s gobble below the beak. Then, place two small dots of icing on the Reese’s Cup and add the candy eyeballs to complete your turkey apples.
And then your adorable Thanksgiving treats are ready to enjoy!
Take them as a fun treat to your child’s Thanksgiving school party, or serve them as dessert at the kids’ table this holiday. You may even find yourself sneaking one after the kids go to bed… did I forget to mention, these little guys are super tasty!
How to Store the Chocolate Turkeys
You can store the chocolate apple turkeys in an airtight container in the fridge for a day or two, but it’s best to eat them pretty quickly. After 2 days, the apples start to get mushy and they’re not as good.
More Thanksgiving Ideas for Kids
If you loved these cute Thanksgiving snacks, then check out some of my other Thanksgiving ideas for your little ones:
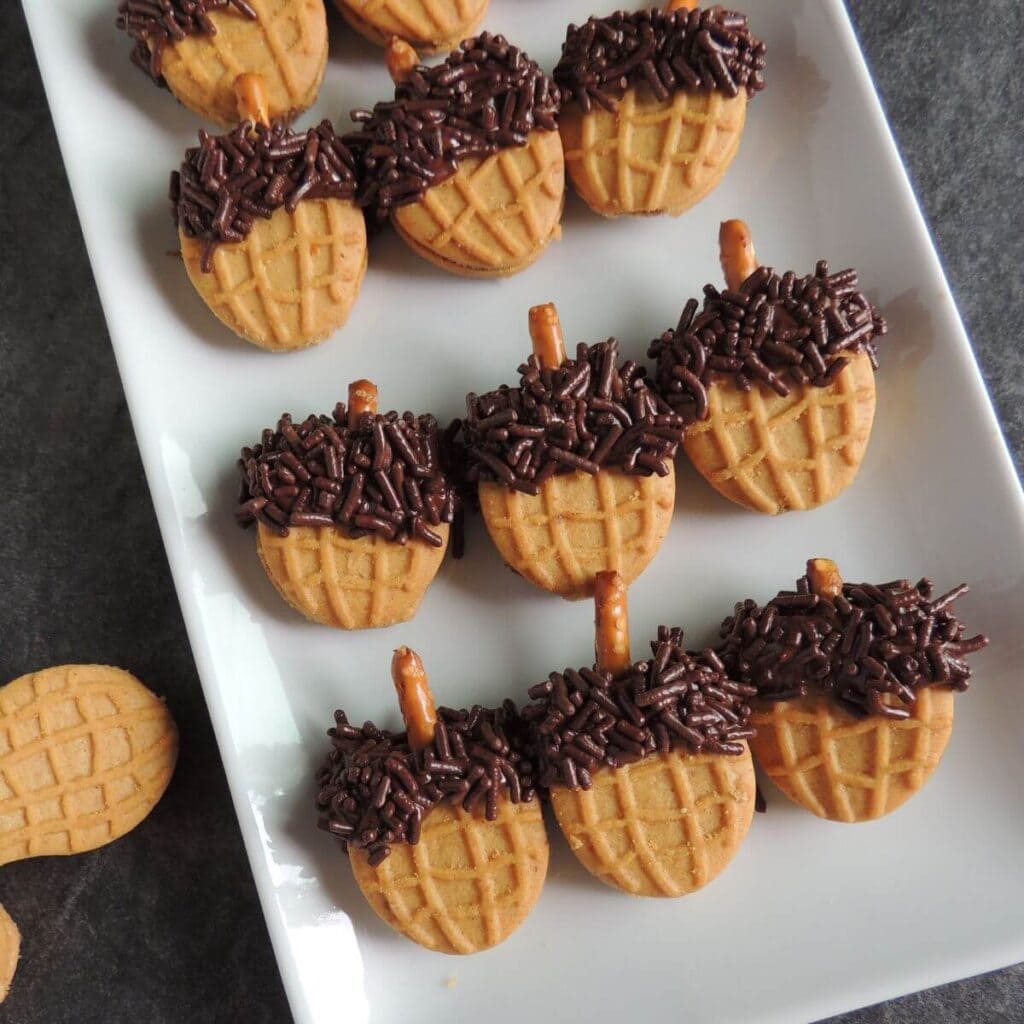
Acorn Cookies – These cute acorn cookies are another no-bake treat that kids love for Fall! Made with Nutter Butter cookies and sprinkles, these are great for holiday parties or an after-school treat!
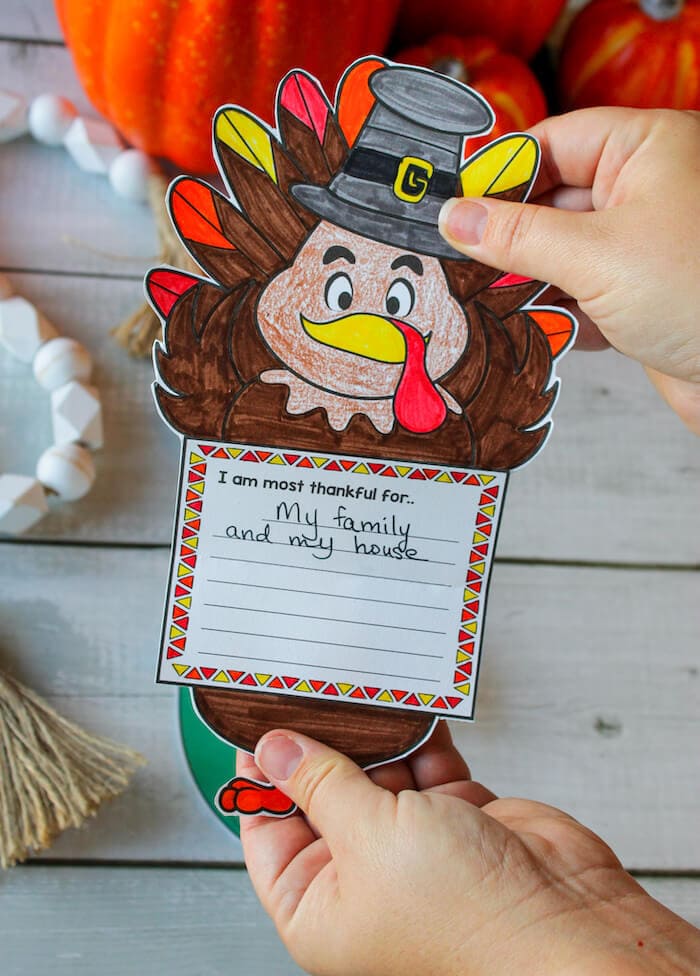
“I am Thankful For” Writing Crafts – These thankful crafts for kids are a great way to practice gratitude during the month of November!
*This post was originally published in November of 2020, but it has been recently updated to include new photos and a recipe you can print out and save for later.
Be sure to PIN this post to your Thanksgiving Ideas board on Pinterest so you can save it for later:
Chocolate Apple Turkeys

If you’re looking for fun and cute Thanksgiving snacks for kids, then look no further! These chocolate apple turkeys are made with apple slices and decorated to look like turkeys. The perfect treat to celebrate Thanksgiving with your little ones!
Ingredients
- 2 large Honeycrisp Apples - You will need large apples to be able to fit a large Reese’s cup in the middle of the slice
- ½ can of store-bought vanilla icing
- Red and yellow gel colors - to tint the icing
- 6 oz Semisweet chocolate chips
- 8-10 Yellow M&M’s - one for each turkey
- 64-80 Candy corns - eight for each turkey
- 16-20 Candy eyes - two for each turkey
- 8-10 Large Reese’s Cups
Instructions
- Prep the colored icing. Divide the ½ can of frosting into two small bowls. Add red gel coloring to one bowl and yellow gel coloring to the other bowl. Mix each individual color well until desired colors are achieved. Add each icing color to its own piping bag with a fine piping tip. Set aside.
- Prepare the apple slices. Cut the apples into ½” thick slices, across the apple so that the core is in the center of each slice. Use a small circle cookie cutter or paring knife to remove the core from each slice.
- Melt the chocolate. Pour the chocolate chips in a microwave-safe bowl, and heat in 20-30 second increments, stirring in between, until melted. Be careful to not burn the chocolate!
- Decorate the apple turkeys. Dip the top of one apple slice into the melted chocolate. Immediately place a Reese’s cup in the center of the apple covering the hole, and place eight candy corns around the top half of the Reese’s cup to look like turkey feathers. Work quickly before the chocolate hardens up. Repeat for the remaining apple slices.
- Pipe on the yellow icing decorations. Using the yellow icing, add two small feet below the Reese’s cup. Place a dot of yellow in the center of the Reese’s cup, and press the yellow M&M standing up into the yellow icing to look like the turkey beak. Then, place two small yellow icing dots where the eyes go, and press the candy eyeballs onto the Reese’s cup.
- Pipe on the red icing turkey gobble. Using the red icing, pipe a small squiggly line below the yellow M&M to look like a turkey gobble.
- Serve. Allow the decorations to set, and enjoy! *You can store the decorated apple slices in the fridge for 1-2 days, but it’s best to eat them pretty quickly before the apples get mushy.
Notes
- If your canned frosting appears too thin, you may add ½ to 1 tablespoon of powdered sugar to the canned frosting before mixing in the coloring. This will help to create a stiffer icing.
- Be sure to not cut the apple slices too thin or they could break. You should be able to get 4-5 slices from each large apple.
- If you don’t have a very small circle cookie cutter to core the apples, you can use a paring knife to cut out the core.


These are super cute and fun to make! They were a big hit at work and were the center of conversation for quite a while. Thanks for the creative idea!
do you dip both sides of the apples …If not what prevents the other side from turning brown…
Hi Margaret! We didn’t dip both sides, but you could. When I prep a bunch of apple slices at the beginning of the week for my daughters’ lunches, I toss them in a little bit of lemon juice before putting them in individual ziploc bags. They last the whole week in the fridge without turning brown. So for these Thanksgiving treats, you could toss the apples in a little bit of lemon juice and let them dry a bit before you dip them. We stored ours in the fridge in a ziploc bag after they were made, and we had all of them eaten within two days of making them, so ours didn’t turn brown. I would definitely recommend eating them within two days of making them, though. Hope that helps!