
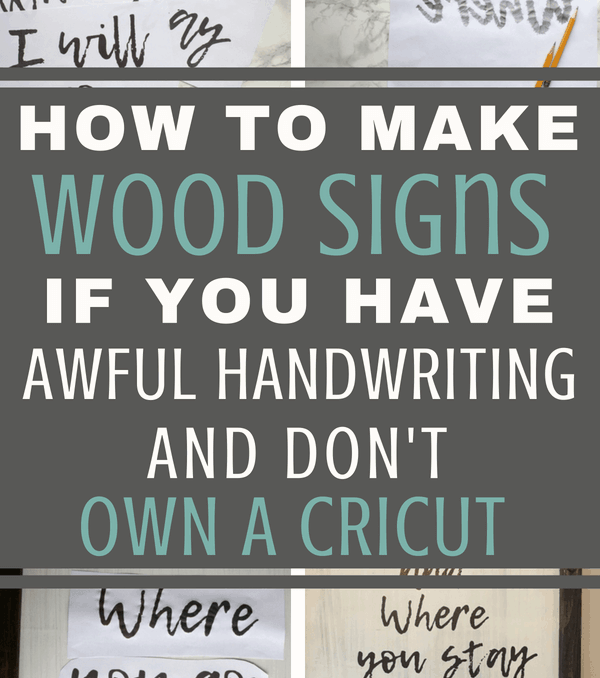
If you want to know how to make wood signs, then you are in the right place! Yes, you can make DIY wood signs with these easy steps, even if you don’t own a vinyl cutting machine and your handwriting is awful! (Trust me, my lettering looks like chicken scratch!)
I am so excited to share this amazing DIY project with you today!
This is my absolute most favorite thing that I have ever made (patting myself on the back!), and if you’re wondering how to make your own sign, then you’ll love it too!
I am even more in love with these DIY Farmhouse Wood Signs than my DIY Large Canvas Wall Art and my DIY Faux Subway Tile Fireplace, which is saying a lot because I LOVE those projects, too.
But this duo of DIY wood signs is the end all be all of DIY farmhouse decor. And the best thing about this project… it was super easy and super cheap! We made both of these DIY wood signs in one day for under $20.
Read on for the step-by-step tutorial to craft your own easy DIY Farmhouse Signs.
How to Make Signs
Step 1: Gather your supplies for your Farmhouse Signs
The first step is to gather all your materials. To complete this project, you only need a few inexpensive supplies:
- Black Sharpie marker (or colored Sharpie of your choice)
- Printer and printer paper
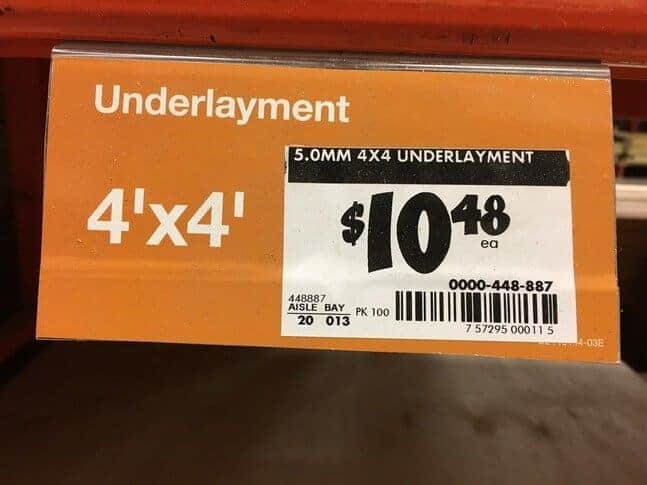
- Underlayment boards – Cut down to the size that you want
This is the type of board that we used, cut in half so that we had two boards that were 2′ x 4′ each. You can find this at any home improvement store. We had Home Depot cut the board for us.
We have found that this is the best cheap wood to use for DIY wood signs because it has a smooth surface, and it is light so it can easily be hung on the wall.
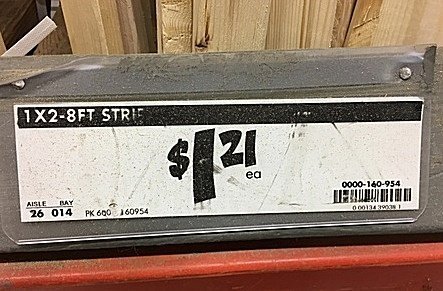
- Trim – Cut to the size that you need
We used the cheapest 1″ x 2″ trim boards that we could find. The boards that we used were 8 feet long and only cost $1.21 per board. We bought 3 boards for our large DIY wood signs.
I’ve gotten a lot of questions about the exact boards that we used for the trim, so here’s the Home Depot shelf tag. The tag reads 1″ x 2″ 8 foot strip:
- Stain of your color choice
We used a wood stain that we had leftover from other projects. Just choose your favorite stain, or mix a few cans to get the perfect color for your DIY wood sign frame.
- Paint of your color choice
- Nail gun and 1″ nails (or you could use a hammer and nails)
Step 2: Paint and stain your base for your DIY Farmhouse Signs
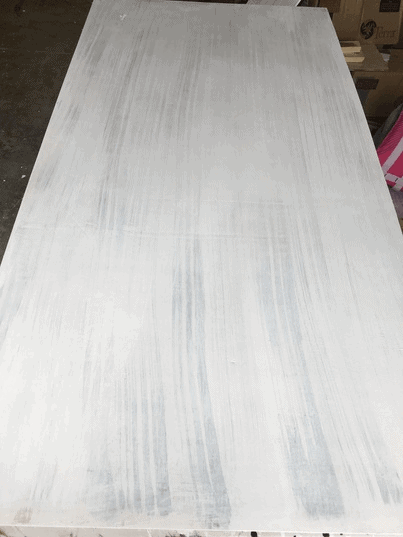
To get this look, we used Minwax Wood Finish Penetrating Stain in the color Espresso and Behr Premium Plus Ultra paint in Frost.
First, use a paintbrush to apply the stain to the underlayment board using the lightest pressure possible and allowing the natural brush strokes to show. You don’t want to completely cover the board – just apply a small amount because you will be painting over it.
Allow the stain to dry completely, then lightly paint over the stain with the Behr Frost paint. Make sure to cover the whole underlayment board in white, even though you did not stain the whole board. This gives the new underlayment board an aged look, perfect for a rustic sign.
Step 3: Stain your trim
The next step is to stain the trim pieces for your wood sign frame. We prefer to use a scrap piece of fabric (actually a cut piece from an old cotton sheet) for staining wood. But you can also use a sponge or paintbrush to apply stain to the trim pieces.
Step 4: Build your base
To attach the trim to the underlayment, my husband used a nail gun and 1″ nails. If you don’t own a nail gun, don’t worry! A good ol’ fashion hammer and nails should work just fine for these DIY farmhouse wood signs.
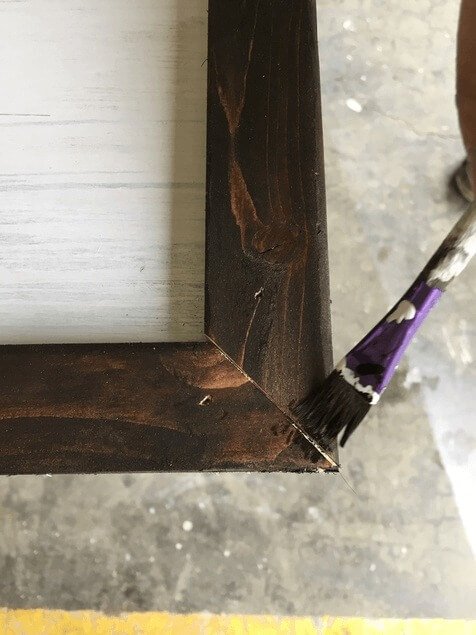
Once you attach the trim, you will need to stain the back edges of the underlayment so that they are not visible when you hang your finished DIY wood signs.
To do this, we just used a small paintbrush dipped in stain, like so:

You will also need to apply a bit more stain to the seams where your frame pieces meet in the corners… By the way, make sure you drive the nails into the back side of your frame so that you don’t see the nail holes from the front.
We did not do that the first time… So you can learn from our mistakes when you make your own homemade wooden sign:
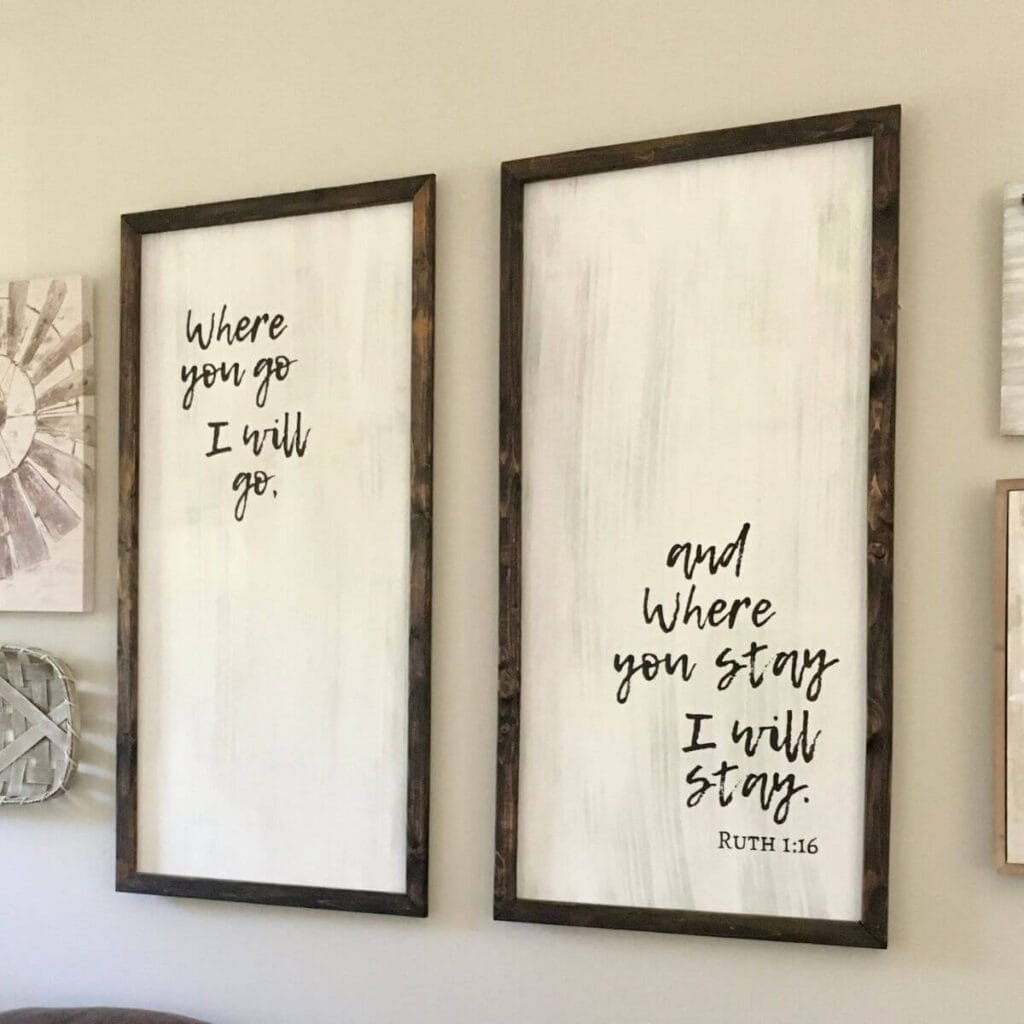
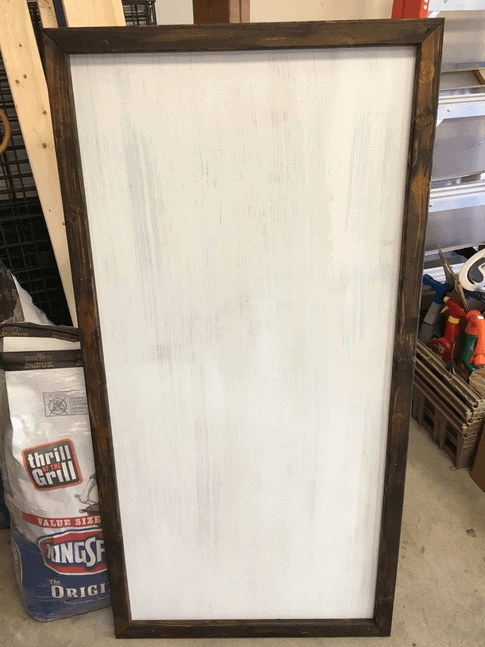
Here’s the finished base. Beautiful, isn’t it?!
Step 5: Decide on a quote and a font for your DIY Signs
The beauty of this tutorial for easy DIY farmhouse wood signs is that the possibilities are endless. You can use whatever color/font/quote/verse that you want.
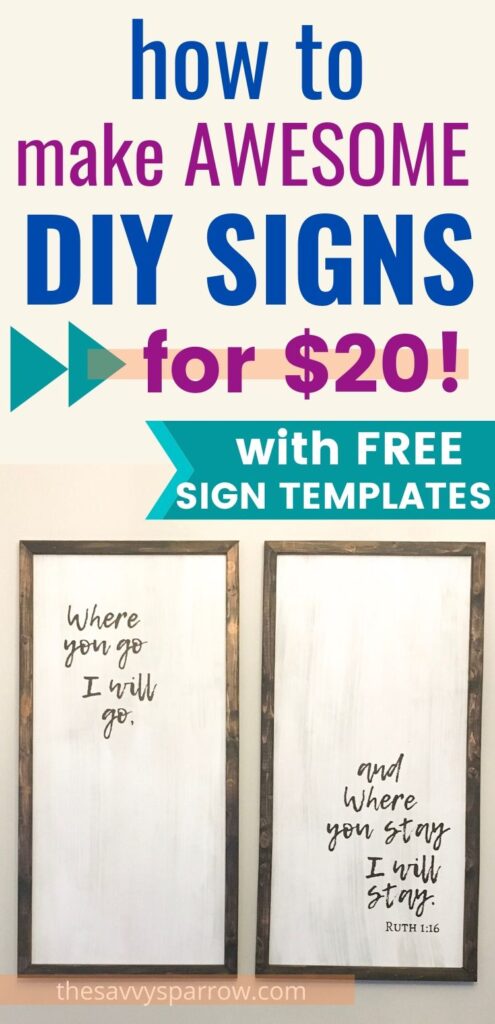
We were in Hobby Lobby last week and fell in love with a duo of farmhouse signs that had the bible verse Ruth 1:16 on them. Until we looked at the price… $89.99! I looked at my husband and said, “I bet we can make those wooden signs ourselves for way cheaper.” Whenever I say that to him, he must take it as a challenge because fast-forward a few days, and he’s bringing home wood from the hardware store.
So, roam the aisles of Hobby Lobby for some inspiration or search Pinterest for quotes that speak to you.
Step 6: Print out your quote in the font of your choice
To do the lettering on your own DIY wood signs, you only need a printer.
Yup, a regular old printer and regular old paper – No expensive Cricut or vinyl stencil needed for this sign design!
And you can print it out in black and white, even if you want your finished DIY wooden signs to be rainbow-colored.
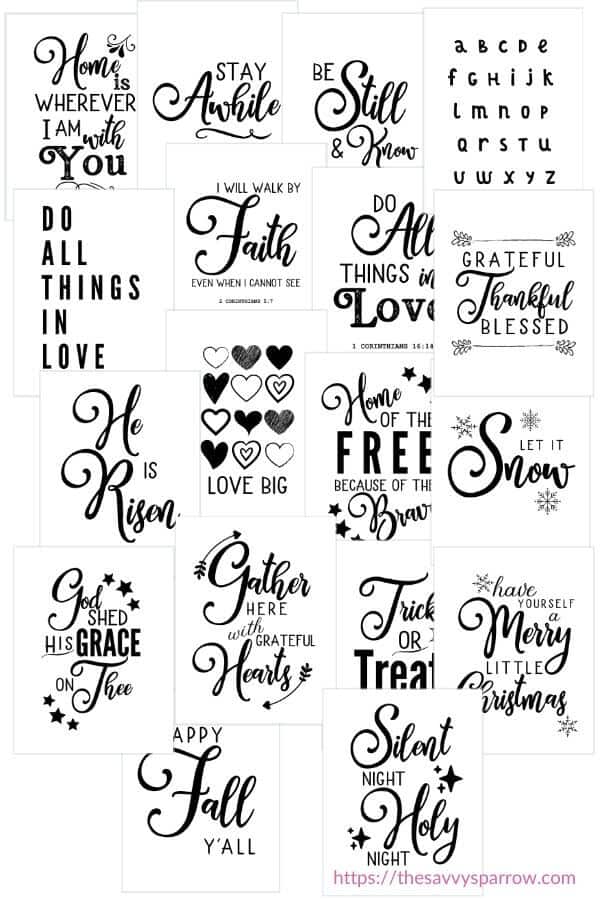
*Want to make the same DIY signs with the Ruth 1:16 verse that I used? You can click HERE to download the PDF sign template so that you can replicate our easy DIY farmhouse wood signs.
Or, you can head to my shop HERE to see all of my DIY Sign Templates!
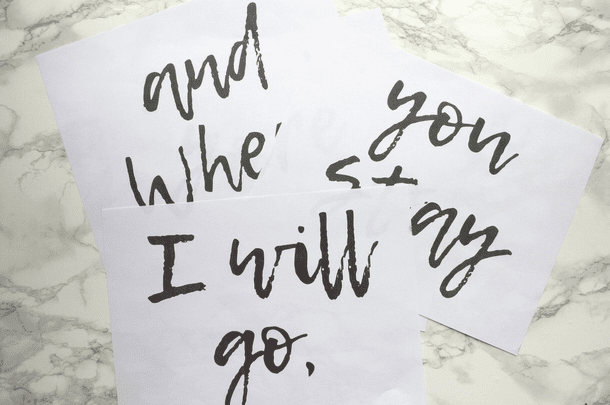
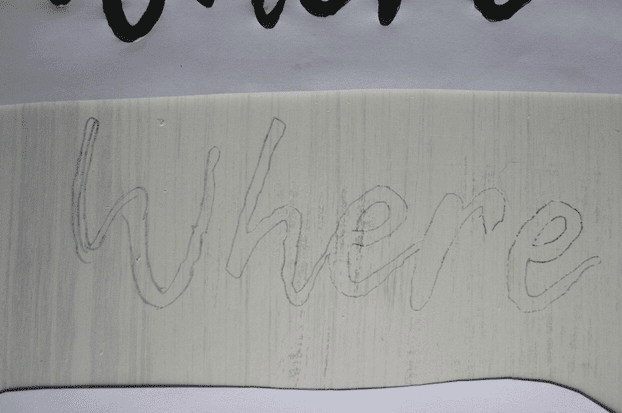
Step 7: Flip the paper over and scribble over where the letters are
Complete this step in a well-lit area because you want to make sure you completely cover where the letters are on the opposite side of the paper.
Use a pencil if you will be stenciling on a light-colored backdrop or chalk if you will be stenciling on a dark color like stained wood.
I know that may seem a little confusing… Here’s what I’m talking about:
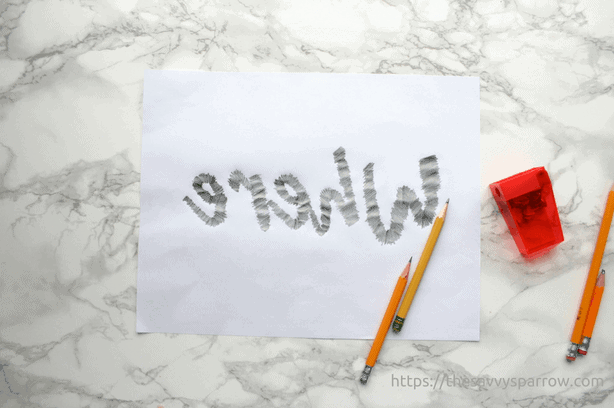
On the reverse side of this paper is the word “Where” that I printed out in Step 6. I had to keep holding my paper up to the light to make sure that my pencil scribbles completely covered where the ink was on the opposite side of the paper.
*Kids want to help? This is a great step for them to do so that they feel like they are contributing to your DIY wood signs! I put my girls (ages 8 and 6) to work on this step, and they did a great job!
**If you are making a lot of signs, then I recommend the carbon paper method! It’s quicker than this pencil transfer method, and you can get a pack of 100 sheets of carbon paper for less than $10!
I used the second method to make this DIY Sign on Canvas… be sure to check out the video in that post, too!
Step 8: Place the papers pencil side down on your wood sign where you want them
Make sure you get your quote perfectly straight before you move on to the next step. If you’re off even a little bit, your whole sign will look crooked. I even got out a tape measure to be sure that I placed my papers in exactly the right spot.
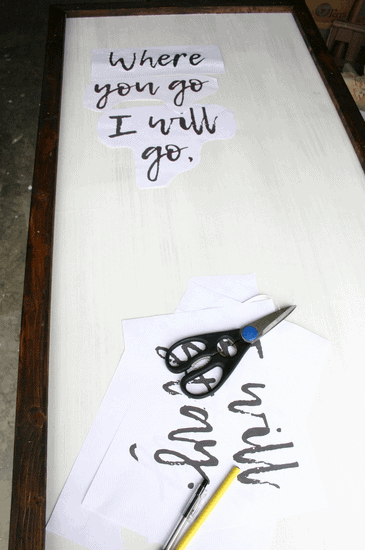
Step 9: Using a ballpoint pen, trace the outline of the letters you printed
Look closely… see the purple pen marks?
Trace the outline of your printed letters onto your homemade wooden sign, and be sure to get every last detail. That’s why my finished verse looks like it was hand-painted on versus stenciled in black Sharpie. Yes, it is a bit tedious (especially if you chose a very detailed font like we did) but, trust me, the end result is fabulous!
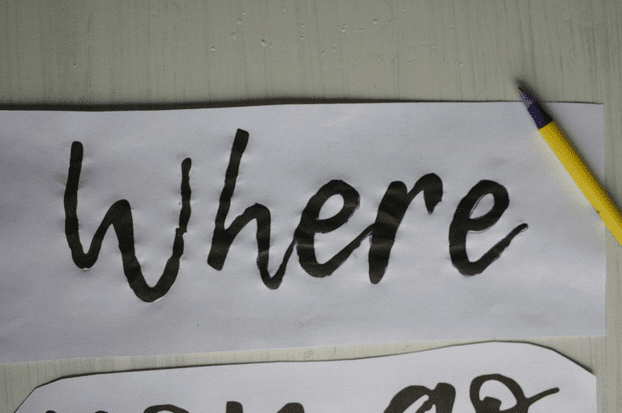
Step 10: Remove the papers from your DIY sign
Voila! Just like magic, huh?
You should now have lettering on wood from your pencil marks!
The pressure from the ballpoint pen on the front makes the pencil marks from the back transfer to your sign! How cool!
Step 11: Using a sharpie of your choice, color in the outlined pencil marks
I used a dual-tip (chisel and fine) black Sharpie! But this could be done using any color sharpie that you want, or if you’re feeling extra ambitious, you can use paint or a paint pen. However, I have done DIY wood signs using paint before and it is much more difficult to control a paintbrush than a Sharpie marker.
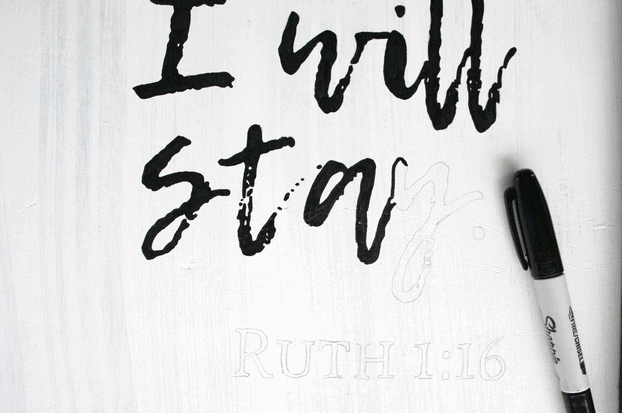
I’ve also gotten a TON of questions about how I got the words to look like they were painted on with a paintbrush…
It’s all in the details of this awesome font! The name of the font is “Lemon Tuesday”.
See the blank white space in the middle of the “t”? When I was tracing the front of the font in Step 9, after I had scribbled the pencil on the back of the paper, I actually traced around each and every dot/crevice/cranny.
When I removed the paper from the wood board, the pencil mark letters were then very detailed and I colored in each little detail with my Sharpie marker. You can kind of see the pencil mark details that I’m talking about on the unfinished “y”.
Yes, all of the details take a bit longer to complete, but you know what they say… it’s all in the details!
And those little paintbrush-like details are what make these DIY wood signs so beautiful and rustic!
Step 12: Hang up your awesome and easy DIY farmhouse wood signs!

The last step is to hang your DIY farmhouse sign! Isn’t the finished product just awesome?! This picture doesn’t even do it justice.
We have a HUGE blank wall in our living room with 14 foot ceilings, and we needed something that wouldn’t look puny to hang there. And we didn’t want to spend a fortune to purchase large wooden signs.
I couldn’t be more thrilled with these easy DIY farmhouse wood signs!
UPDATE – Here’s how these DIY wood signs look 2 years later:
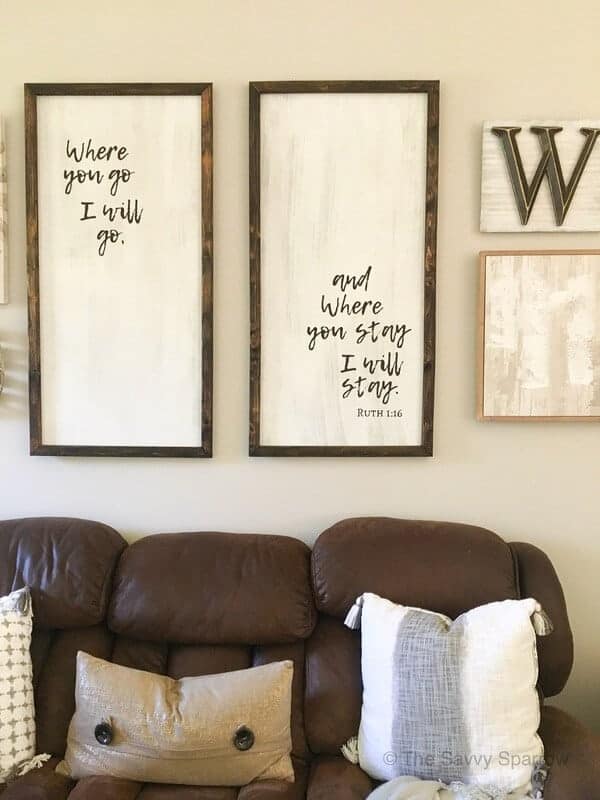
They still look BEAUTIFUL, and they are holding up perfectly, even without any type of sealer.
And these DIY wood signs have inspired me to create even more easy signs over the past few months…
This DIY Sign on Canvas uses a printable DIY Sign Template and the carbon paper method:

And this easy DIY scroll sign is 10 signs in one… You just change the paper roll with each season!
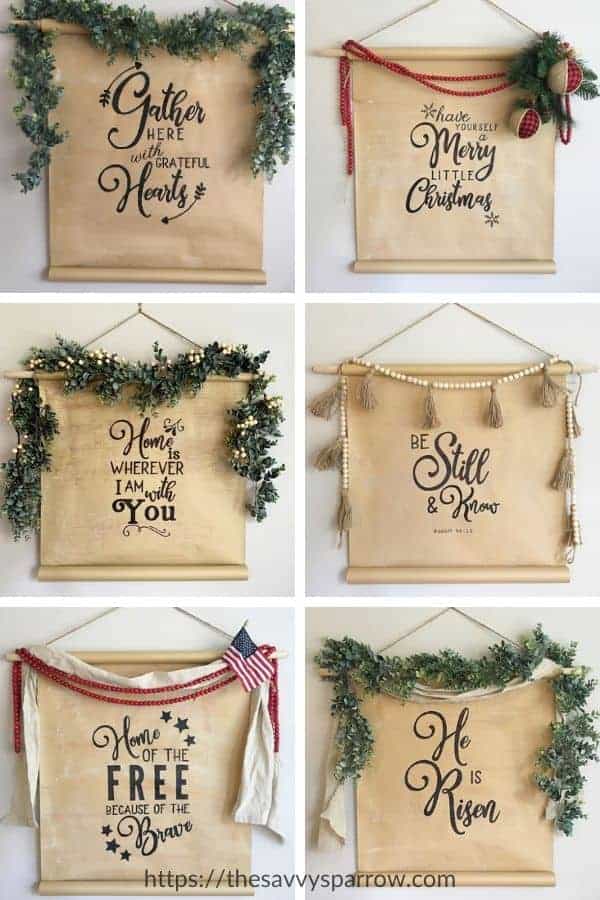
All of these signs use DIY sign templates, that you can easily print out on your home printer to make LARGE wood signs! *If you want to learn how to make your own sign templates for DIY signs, check out this post: How to Make Printable Sign Templates for DIY Signs
Now it’s your turn! Just follow my simple steps and you’ll be on your way to creating amazing and custom easy DIY farmhouse wood signs in no time!
But be warned… once you make one, you’ll want to make a bunch more!
Loved this DIY wood signs tutorial? Check out some of my other DIY projects:
- DIY Scroll Sign
- How to Paint Faux Subway Tile – A DIY Fireplace Makeover
- DIY No Sew Curtains in Less than One Hour!
- DIY Large Wall Calendar – A staple in my home office because it lets me see all 12 months at the same time!
And be sure to PIN this easy DIY signs method for later when you’re ready to create your own home decor signs:


Hi Amy,
Love your site. Very simple and clear instructions.
My question though is if I purchase the template bundle do I have permission to sell what I make or are these just for personal use?
Thanks!
Hi Dan! These are just for personal use – sorry about that. 🙂
I have a hard time finding programs that will let me print out letters for signs. Suggestions?
Hi! I would recommend Canva – it’s free to create an account, and they have a TON of different fonts to choose from. And it’s also super easy to use! From the home screen, just select create a new design in US Letter size (8.5″ by 11″) and then it will open a new blank sheet for you. From there, you can select “Text” from the side bar and add your letters. Then just download it as a PDF to print. 🙂
Thank You for the sign lettering procedure
Thank you soooo much for this blog! I needed to get letters on a small project pretty quickly and I really didnt want to do the reverse-lettering mod podge method. My project turned out great!
Hi Amy! Glad to hear it- this is my favorite lettering on wood method ever! I’ve used it multiple times for lots of different projects… always turns out great!
Hi. Great tutorial. I have used the graphite paper method for years filling in the letters with paint as I usually topcoat with a clear matte spray. Several years ago, I discovered a new method. On Amazon, you can purchase transparency film sheets for inkjet printers. Then in what ever program you use to print your words, set your font to outline only. I personally use Page Plus and it allows you to set line color as black and fill color as white so when the words print it is only the outline of each letter. Reverse your image and print on the transparency film, let dry for 1-2 minutes then place the film on your board. You can hold it down or tape it down with a few little pieces of painters tape and gently rub over the lines with your fingernail, a popsicle stick or even a pen cap. The ink comes off the film onto your board. The film is nice to use because it is clear and you can see exactly where you are putting your print. When you are done, simply clean the film with alcohol and it can be used again. I would like to note that the transparency film has a rough side and a smooth side. The rough side is for making projector transparencies, the ink won’t come off so make sure you use the smooth side. If the film sheets you get simply say print on this side, then print on the opposite side for this method. I hope that all makes sense. It really does work well.
That’s an awesome tip! Thanks so much Brenda – I will definitely be giving this a try!
I want to paint Carpe diem on the side of my art studio in large letters 12-14” tall in a pretty script font. How can I do this easily? Could you help me achieve this?
Hi Diane! You can do the same method with carbon paper. I would use a program like Canva to create your letters – one large letter per page – because they have a lot of great font options and it’s very easy to use. Then, download the file as a PDF – so you would have 9 different pages. Then, go to “Rasterbator” – it’s an online program that allows you to create a tiled version across multiple pages. In that program, select the output as 2 pages tall by 1 or 2 pages wide. Hope that helps!
Always wanted to know how to do that fancy writing on wood etc.
What an awesome method. Thanks for sharing. I even think I can do this.
Ok. Been wanting to do this forever.
I’m doing garden related signs.
You have THE BEST TUTORIAL!
I have tried writing my own signs but they haven’t always turned out right! I will definitely try out your method. Thank you!
beautiful… thanks for the DIy tips
This was an absolutely wonderful DIY tutorial! I very rarely read an entire blog, but I was engulfed with this one! I cannot wait to make a farmhouse sign now! Thank you so much for all of the useful information and the step-by-step instructions. And your sign is absolutely fabulous!
Thanks Angie! This is really my absolute favorite way to do lettering on wood for DIY signs! Glad you enjoyed it. 🙂
great looking saying
very interesting and inspiring keep it.I will definitely make it.Thanks
Your tutorials are very helpful and I will be trying them soon.
Thank you for sharing your experience and knowledge.
I have a piece of barn siding from my grandparents farm. I will use your idea which I think is the greatest. The sign will have three lines which will read Lorenz family, Farm, 1920. Thank you for a wonderful idea.
Hi Michael! That sounds like an awesome idea to use a piece of barn wood from your family’s farm to make a nice heirloom work of art… good luck! 🙂
Thank you! I love this craft so much and have looked for good tips. This is a keeper!
Hi Kathryn! So glad you liked the DIY wood signs tutorial… this is my absolute favorite method to make your own signs, because you can customize them to say anything and it’s super easy. 🙂
Love this!
Suggestion, if you use a “nail gun” and don’t like the holes, some water around the hole and a iron (I like using an old hair straightener that got broken) the wood will swell up and close the hole.
Also Please note by nail gun she is (hopefully) referring to either a Brad nailer, leaves a small hole, or a pin nailer, barely leaves a hole, so small if you didn’t nail it you would most likely never see it. A narrow crown stapler leaves a noticeable mark but has excellent holding power. There are countless types of “nail guns” on the market, so please be safe and don’t think any nail gun will work.
Yes, that’s a great point! We used a brad nailer so the nail holes were very small. We’ve had our signs hanging on our wall for over 3 years now, and they’ve held up great. Thanks so much for the tips! 🙂
I look forward to getting creative with your ideas. Thanks!
Hi Edna! Thanks so much – glad you liked the post! 🙂
Absolute Genius! I love this! I have always wanted a Cricut but I can’t really justify the expense.
I can not wait to try your genius method of making beautiful signs. Thank you for sharing this idea and an extra big thank you for sharing the cost cutting ideas for the supplies.
💗 Melissa
Hi Melissa! Thanks so much for your sweet comment! So glad you liked the DIY wood signs tutorial… the big signs that I made for my living room are still one of my favorite DIY projects that I’ve ever done, and they still look brand new after about 4 years. This lettering technique is SO easy to do, and I’ve done it on other surfaces also (even on canvas with the value pack canvases that you can get at the craft store). 🙂
Good Morning Amy,
What a wonderful, cheap and easy way to make signs. Thank you for this idea. I have been debating on whether to buy a Cri-cut machine or not. You have won this debate. Thank you so much. I will definitely let you know how your idea works out. Thanks again. Have a blessed day.
Sincerely,
Martie
Hi Martie! Thanks so much for your sweet comment! I absolutely LOVE making signs this way, and I really feel like this lettering method is probably much easier for beginners because there’s no new software or machine to learn like you would have to on a Cricut. I’m sure your signs will turn out beautifully! 🙂
Well, I am impressed. Great work and excellent description!
I feel renewed after a pong , hard day. Now off to bed and will try your method on the morning!
Awesome! So glad you liked the post… let me know how you like this sign making method. 🙂
Amy,
Love this idea!!
My signs will need to be weather proof, have you tried the clear over the top yet? Spray or brush?
Keep the great ideas coming.
Thank you for your time!
Hi Clare! I still haven’t tried the clear on top… but my signs look just as good now as the day I made them. As long as you let the Sharpie marker set for a couple days, I would think that it would be fine… you could always test it on a small scrap of wood also. 🙂
Love it I need to try this!
Hi Lydia! This is my absolute favorite way to do lettering on wood for DIY signs! We’re about to make one with some lyrics from our wedding song to hang over our bed. 🙂
This was so neat…can’t waitt try it…
Thanks Loretta! It really is super easy and the font options are pretty much endless. 🙂
This js so cool. Send me some freebies
Amy, I enjoy your post. When my little sister retired, bought house on the lake with wrap- around porch she wanted to fill porch and wooded fence with signs. The easiest way I found to transfer letters onto wood , was before printing, I manipulated saying via Microsoft Word and/ or Photos on my Windows 10 laptop, flipping 180°.I laid picture, print side down on to wood I had already stained, wiped on a little water using a clean foam makeup sponge (helps keep paper in place and easier to see letters) then using a large sharpie, cap on, rubbed the printed area. The ink transfers directly on to the wood (canvass, too). Especially works well on pictures (fish, rod and reels, etc) I then went over with Sharpie oil-based markers, so it looks painted on, sealed with poly for outdoor protection. You’re right about being addictive, in less than 3 days, I made her 14 signs (5×8 & 8X 10, mostly) only stopped because printer ran out of ink.
That’s awesome! I’ll have to try that technique next… I’m really wanting to make a long and narrow sign to hang over our bed with our wedding lyrics on it. Thanks so much for the comment! 🙂
I couldn’t see the video on the website do you have social media ? Or YouTube ?
Hi Jessica! There actually isn’t a video in that post… But we do have a video in this post that shows how to use carbon paper to transfer lettering (which is actually my favorite way to make signs) – https://thesavvysparrow.com/diy-scroll-sign/ I don’t have a full video of how to make the wood signs start to finish, but it’s on my list of things to do. Thanks for reaching out! 🙂
Ok you can print on wax paper in reverse and just rub over the pattern with marker cap puts ur pattern right on wood so easy
Hi Pat! Thanks for the tip… I will have to try that lettering on wood method next! Do they make special sheets of wax paper to use in a home printer? Like pre-cut sheets that are the 8.5″ x 11″? Or do you just use the regular wax paper you buy at the grocery store? I would be afraid that the wax from the paper would mess up my printer? Thanks for the comment!
Very impressive. I really appreciate your work, you explained it very well.
I love your signs and the way you told us what to do. I will be trying it soon.
Great! So glad you found the tutorial helpful! You can also buy blank pre-made sign boards and frames at craft stores like JoAnn’s and Hobby Lobby to make it even easier. Good luck! 🙂
How would I prep a sign blank that I got from Hobby Lobby, and what would I use, permanent vinyl instead of stencil? It’s going to be used inside. I made a sign but didn’t prep it beforehand and ironed on removable vinyl, and the letters are peeling. I’m going to try and make it again.
Hi Cheryl! Yes, I would definitely use permanent vinyl if you’re making your sign with a Cricut… but the Sharpie marker and tracing option with the print out option works great also. My absolute FAVORITE way to make signs is with the carbon paper tracing method for the outline and then coloring in with black Sharpie. You can see a video of how I made a cool DIY Scroll Sign using carbon paper on this post: https://thesavvysparrow.com/diy-scroll-sign/ Hope that helps! 🙂
Hello,
I have been making signs on wood using this method for about 3 yrs now. I use repurposed wood from various places. I love this method because it’s hardly costs anything. I didn’t get a chance to read thru all the comments above as there are a lot of them, so somebody may of already mentioned this. If so sorry for repeating i but I use graphite paper instead of carbon paper because it is more forgiving. Meaning that you can erase the marks left from the graphite paper incase you mess up, which I do alot. Let’s say you are finished putting the words on your sign & you remove the paper & notice that a couple if your words are crooked . If you had used the graphite paper it would be just like you had used the pencil scribbling on the back of your paper & you can just erase the crooked words & try again. The graphite paper is also inexpensive. I just love diy projects especially repurposing things. Your signs look awesome by the way.
Thanks so much, Cassie! I didn’t know about using the graphite paper instead of the carbon paper! I started using the carbon paper for larger DIY signs, because I got tired of having to do the pencil marks on the back side of the paper… it’s so much easier! But, I have not had a mess up yet with the carbon paper, so I didn’t realize that it’s more difficult to erase. I will have to buy some graphite paper to check it out. Thanks so much for the tip! 🙂
I was in hobby lobby about a week ago and fell in love with this sign! Until I saw the price, lol. This verse was in a song from our wedding 20+ years ago. My husband is a pastor and I do indeed follow where he goes. Can’t believe I came across this while googling diys for tier tray signs! Which I can totally use this concept for that. I would love the file so I can make my own! Your signs are all beautiful. PS, sorry if this posts twice. My browser crashed the second before I hit post after typing this all out, lol
Thanks Jan! Yes, once you have the tracing/transfer technique down for making signs, then you can really transfer any design to pretty much ANY surface, just like I did for the canvas signs, the paper scroll sign, and stenciling on drop cloth. And if you use transfer paper (like I did on the canvas signs), then it’s even easier! I can send you the Ruth scripture file to your email right now. Thanks so much for your comment! 🙂
I love the tip for making the lettering look painted. I’m not sure if anyone else suggested this, but to trace the lettering on a darker surface, chalk or a light colored good pencil color can be used on the back rather than pencil. Just blow off any loose chalk before you start filling in with the Sharpie.
Yes, great tip! Chalk works well for tracing on to a dark surface… you can also buy white carbon paper for dark surfaces, which makes this technique even easier. Thanks for your comment! 🙂
Love your explanation and steps !! Great job Thank you !!
I am trying my make my first DIY wood signs. I got pine wood from Home Depot. I stained one of the sides. But I think its a bit too dark. Would it work if I get a lighter stain or change my technique for the other side of the board ? Please guide Thanks so much !!! Love your signs 🙂
Hi! Are you talking about applying the stain to the sign part where you will paint over it with white? If so, you could just go a little heavier on your white paint to cover up a bit more of the dark stain. Getting a lighter stain is a good option too. You could also try using a grittier sand paper to sand off a bit of the stain to lighten it up. Thanks so much for your comment! Good luck! 🙂
I haven’t tried that but if it bleeds through the paper I wonder if the edges would be uneven. But, that might add to the rustic look. Would love to see a picture if you tried or do try it. Maybe I will try on scrap wood. Thanks.
Hi Kim! The edges shouldn’t bleed through, because you’re not really using the paper as a stencil. You’re just tracing the design… I also wrote another post here about using the carbon paper sign method…https://thesavvysparrow.com/diy-scroll-sign/ There’s a video in that post so you can get a good visual! 🙂
I love you signs and your instructions, you make it seem so simple! I am making a wedding gift and wondered if you could forward me the stencil for the Ruth scripture? Thank you so much! Signing up now so I can see more of your creative work 🙂
Hi Kim! Did you see the Ruth scripture template in my Freebies library? So sorry… I just saw your comment! I can still email it to you if you need me to. 🙂
This is wonderful! Can you send off your font list please. I really like the way you laid everything out and to have your hubby help is a plus plus! Have a great day!
Hi Claudia! The font name is called “Lemon Tuesday”, and I make my sign templates in a free program called Canva, where you can find that font. I wrote an entire post on how to make your own sign templates here: https://thesavvysparrow.com/how-to-make-printable-sign-templates-for-diy-signs/ . Let me know if you have any other questions! 🙂
Thank you for the tutorials and tips.
Is your couch looking at us? Lol
Haha! I just noticed that! 🙂 Glad you like the sign tutorial! Thanks for the comment 🙂
The craft stores also sell what is called graphite paper, kind of like transfer paper but it’s used for pencil tracings. Works great for transferring letters on signs. Also, you can use unwrapped canvases for the frame. Great article.
I never thought about using unwrapped canvases for the wood sign frames! That’s a great tip! I have used carbon paper to do lettering for signs… it sounds like it’s the same thing or similar to transfer paper. Thanks so much for your comment! 🙂
For the trim, did you have home depot cut them to size also? If so what were your measurements for the trim? This will be my first diy sign and I’m really excited to try it.
Hi Sabrina! We cut the trim ourselves. The outside of the angle (the longest part of the trim board) measures 24″ for the top and bottom and 48″ for the sides. You can also just make straight cuts instead of doing the angled corners. Then, it would look more like these wood framed canvas signs, which is easier to do: https://thesavvysparrow.com/easy-diy-signs-on-canvas-no-power-tools/ FYI – These are the first ever signs that we made too, and they are STILL one of my absolute favorite DIY projects that we’ve done. Good luck! 🙂
Where did you get and what is the name of the lovely font?
Hi Terri! The font is great, isn’t it?! It’s called Lemon Tuesday, and I got it in the graphic design program that I use called Canva. In the next week or so, I’m actually going to be posting a new DIY project that will show you how to use Canva to make your own template. And they have a FREE version!
I’m wondering if you have to carefully pencil in the original text? Couldn’t you just scribble over all the back and then when you use the ball-point pen be careful and detailed? Just seems like an easy way to save time for longer quotes! Thanks for your advise either way!
Hi Heather! Yes, you can use the ball point pen and trace over all of the details of the letters after you’ve got your pencil scribbles on the back. The pressure from the pen will cause the pencil scribbles to be transferred to the wood. You don’t have to be precise when you’re scribbling with the pencil on the back of the print outs… If you want to save time, you can also use carbon paper. You can buy carbon paper for pretty cheap on Amazon, and if you’re doing a longer quote, it’s a GREAT time saver. Check out this post on my DIY Scroll Signs to see how I used this method with carbon paper (I made 10 signs in one scroll, and then I just wind it up for each holiday): https://thesavvysparrow.com/diy-scroll-sign/ I’ve got a video in that post also, that shows you exactly how I did it! Hope that helps! 🙂
Can you please send the free email for wood signs
thanks
Hi Priscilla! I just sent you the email with the sign template for the Ruth signs. Be sure to subscribe to my email list using the form in the post too, so you don’t miss anything. 🙂
Yes!!! This is how I made signs for years then one year I asked for carbon paper for my birthday. It was an awesome gift. You can tape them together to make larger pieces also.One sheet goes a long way.
Yes! I actually prefer the carbon paper method, too! I used carbon paper to make an awesome DIY scroll sign on kraft paper and to transfer designs to cheap value pack canvases! Taping the carbon paper together is a great tip! I’ve always just moved it underneath my template as I run out of space. 🙂
Have you ever tried to put this straight onto barnboard without painting or sealing the barnboard at all first? I love the look of just plain barnboard and would love to add a saying to it and wondering if this method would work?
Hi! I actually have tried this same method on pallet wood (probably similar to barn board), and it did not work well at all. I found it really difficult to see the pencil lines on the pallet wood. If you want to use barn or pallet wood, I would suggest using carbon paper like I did in this post for DIY signs on canvas: https://thesavvysparrow.com/easy-diy-signs-on-canvas-no-power-tools/ . The carbon paper is really easy to work with and you get a nice even, dark line. You could also try to sand down the barn board just a bit to make it easier for the design to transfer. Hope that helps!
I am so glad you shared this! I have only been able to find quotes that have been transferred with a cricut and I don’t own one. This is awesome because I am actually working on decorations for my room that have quotes as well as Christmas gifts. I have been attempting to “hand write” all the quotes and they look awful so I get frustrated and start over. THANK YOU! THANK YOU! THANK YOU!
So glad you found this helpful! You can also use carbon paper to transfer designs really easily… I’ve used carbon paper on my DIY scroll signs on paper and my DIY canvas signs. I don’t have a Cricut either, and my handwriting is so bad it’s embarrassing! Like, I really have to try hard when I’m writing notes to my kids’ teachers. Haha! 🙂 Thanks for your comment!
Hi thx for sharing. this is great to know I just made a wood sign & now I fill in the blank was wondering how I was going to get some nice letters on!! Yeehaw I do now. I will be doin the transfer technic glad I found u. 👍🏾
Thanks so much! I’m glad you found me too! 🙂 Good luck on your wood sign!
I don’t even know how to go about getting the fonts ,explain to me how to do that .
Hi Sue! Do you mean how to get the exact same lettering and verse that I used for my DIY wood signs? If so, you can sign up for my free email list and I will send them to you as a free gift, along with the password to my subscribers-only FREEBIES library (with free printable organizers, charts for kids, home decor printables, etc). Then you can just print them out from your home printer and recreate my DIY wood signs!
What did the gold acrylic paint do? Did your husband lightly paint over all the trim with it or just in certain spots? Did you need to cut the acrylic paint with a paint thinner to lighten the colour so the stain would show through? Thank you!
Hi Jeremy! We used the gold acrylic paint to add a little bit of sheen and more dimension to the frame. I wanted more of a rustic look on the frame, and I wanted to highlight more of the wood grain of the trim boards. We dipped a small paint brush in a very tiny bit of the gold paint and just brushed it on randomly in a thin coat. Don’t cover the entire board. And, no, we didn’t use a paint thinner. In the past, we have also used a crowbar to scrape off some of the stain after it dries to get more of a rustic look, but since the trim boards are thin, we decided to go with this paint tecnhique instead. Hope that answers your question!
I am so glad I found you via pinterest. Great tutorial! And I cannot wait to try your other tutorials too.
Thanks for your generosity in sharing what you have learned.
Blessings
Barb
Oh, It would be most helpful if you let us know what kind of pen, (brand name?) you used. Unless maybe we missed it.
And, did you spray sealer on your piece when done..(some pens run when sealer hits them.)
thanks again.
Hi Barb! I’m glad you found me, too! I just used a plain old black Sharpie permanent marker… just the normal one that you can buy anywhere. I did not use any sealer on top. My signs are still hanging in my living room, and they look just as great now as they did when we first made them! If I find that they start to fade, then I will look into different sealer options, but so far, so good! 🙂 Thanks so much for your comment!
The white board that you put the letters on, is that just two 2×4’s put together and sand it down really well? It looks like one board and I did not see the details mentioned.
Hi Kayla! The board that we used is called underlayment. It comes in a 4 x 4 sheet, and we had Home Depot cut it in half for us. The whole 4 x 4 sheet is about $10, so it’s a great value. And we really like it for signs because it is light weight and smooth. Hope that helps!
What did you use for the trip? The wood for the frame.
Hi Tomi! We used the cheapest 1″ x 2″ trim boards we could find from Home Depot. They were 8 feet long and only cost less than $1.50 each. Next time I am there I will take a photo of the shelf tag and add it to the post so you can see exactly what we used. You will have to dig through them to find the straightest ones possible. Those cheaper boards have imperfections, but you can usually find some that are pretty decent.
Yes I was also wondering the same thing! Can’t wait for the shelf tag pic that way I can attempt this! Thanks for the amazing tutorial :))
Hi Rebecca! I will be making a trip to Home Depot later this week, so I will be sure to get a pic and add it to the post. Thanks so much for your comment!
What did you use on the back to hang it on the wall? That’s been my huge debate in wanting to make a farmhouse sign!
Reba, we just screwed two small screws into the back of the frame on the upper left and right sides about 8 inches down. Then we wrapped picture hanging wire around the screws. It was super easy to do, and pretty cheap. Then just hang it on a picture hanger nail on the wall. This is our favorite way to hang art, because it doesn’t require a level and it doesn’t cause a big headache. 🙂
How did you color the letters with the sharpie and leave some white showing through and looking so good? I am talking about the areas where it has the effect or illusion that it was painted with a paint brush that didn’t have enough paint on it and didn’t paint solid.
Hi Susan! The font that I used had those paint-like strokes, so each area that has black specs like paint was actually traced using the same method. I actually traced a whole bunch of those dot-type shapes with the ball point pen so that the pencil marks transferred to the wood. Then, I used the Sharpie to color in the dots. It definitely took a bit longer to do all of those little details, but I absolute LOVE the end result. I hope that makes sense! I will be working on a video tutorial for this project this summer to better explain the process. Thanks so much for your comment! 🙂
Can you put a clear coat over this so it lasts longer?
I would guess so, but I haven’t personally tried it. Our signs have been hanging on our wall for about a year now, and we haven’t had any issues with fading or anything like that. If you do put a clear coat over top, I would try it out on some scrap wood first. I don’t know if a clear coat would cause the Sharpie marker to run. Or maybe try a spray rather than something you have to brush on?
I have founf that using a sheet of graphite to trace my printed letters saves time and is much easier than using a pencil .
I will have to try that method, too! Thanks for the comment Shari!
I tried to save some time by only tracing the letters as one commenter suggested. It was a little hard to see the outline. Then I tried the pencil coloring the back side – WAY BETTER! It takes more time, but then it’s so much easier when you are coloring the font onto your sign.
Yes, Tracey! I completely agree! It does take a bit longer to color the backs of the letters, and your hand will probably hurt afterwards! That’s why I let my kids (ages 6 and 9) do that part. They loved it because they felt like they were helping with the “grown-up” art project. Thanks so much for your comment!
Hi, I’ve used this method a lot. It’s awesome! The sharpie markers bleed on some surfaces, thought, so someone taught be to use paint markers. They have a fine tip, are super easy to control, and really fast. Lots of nice colors, including metallics!
Thanks so much for the tip Sherri! I’ve tried the Sharpie oil-based paint markers on pallet wood, but I wasn’t a fan of them (maybe because I was using the bold point variety)… What type of paint markers do you use?
Amy, so loved your DIY porch sign article. God bless you for freely sharing your techniques and tips. Have you used Sharpie markers for outside signs that are exposed to moisture?
…and, if so, did you need a sealer?
Hi Nadine! Thanks so much for your sweet comment! I have not used Sharpie for outside signs, but I would imagine that it would hold up well without a sealer, as long as it isn’t directly exposed to the weather… So if you do a sign that will be on a covered porch, I think it would be fine. My DIY wood signs in my living room don’t have a sealer, and they look just as good now as they did when I made them 3 years ago. 🙂
I have used carbon paper for years works amazingly! So much easier! ♥
Yes, I need to try that next time! You’re not the first person to suggest carbon paper. Thanks for the comment!
What is the name of the font that you used for this sign?
Hi Ivie! The font is called “Lemon Tuesday”. It’s one of my favorites for wood signs because the details make your signs look like they were hand-painted.
Also, try http://www.DaFont.com zillions if all free!! For free wood we use old fence or old pallets. Big trash in our town you can always find old wood!
Great advise.
Thanks for the great tips, Sharon! I will definitely have to check them out for new fonts. 🙂
just use old fashioned carbon paper and trace whatever you want transferred to your project, words or pictures, whatever
That’s a great tip! I will have to try that next time. Thanks for your comment!
I saw this sign at Hobby Lobby and just stood there in marvel. Such an old and lovely sentiment. Reminds me of, “My Cup Runneth Over”. Swoon!
I agree! This verse fits my life to a “T”, so when I saw it in Hobby Lobby I knew that I had to recreate it! Thanks for your comment. 🙂
Chris Tomlin has a beautiful song based on these words!
Yes, I’ve heard it! It is a great song!
Love your tutorial! Thanks for sharing!??
Glad you enjoyed it! And you can use this method to make a ton of different wood projects. I made my DIY Fall front porch sign using the same method! Thanks for the comment love!
Also, you can skip penciling the back and just trace it with a sharpie. The sharpie will bleed through the paper and onto your sign, leaving your outline. Then you can just fill it in from there!
Great tip, Patti! I will have to give that a try next time. Thanks!
Where did you find the font to print?
I used an online photo editing program called Canva. It’s super easy to use, and they have a ton of cool fonts to choose from.